Pages

Wednesday, December 17, 2014

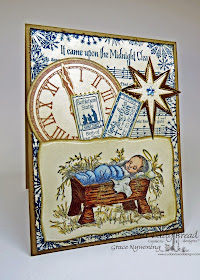
God's Priceless Gift!


Hello friends!  I hope you are enjoying a great week!  I had an unwelcome visitor this past weekend... the stomach bug!  I am so glad to say I'm finally starting to feel well again!  Whew!  Glad that's over with!

Anyway... I have not had time to even look at my craft room lately so I'm going to share a "reject" card I made a few weeks ago, not intending to show it here.   I was going for a collage card to tell a story of our Saviors birth, so I loaded quite a few images on here from Our Daily Bread designs.  I began with a Baked Brown Sugar base from SU!.  I stamped the Midnight Clear Background on ivory card stock, then stamped the clock image from God's Timing, and cut with the ODBD Matting Circles dies.  I die cut a Splendorous Star , and stamped two sentiments from the Admit Three Ticket set.  I die cut them with the ticket die that comes in the Mini Tags die set.  I also stamped the image from The Babe,  colored with Copics and Pencils, and cut with a Spellbinders Curved Rectangles die.  I sponged everything with distress ink to age a bit and then simply layered them up.  I loved the sentiments on these two tickets... especially the one that says "God's Priceless Gift ~ free to bearer" 

God's priceless gift to us on that special night, when God Himself came to dwell among us... is beyond my comprehension!  Have you ever thought about what He left in heaven... to come live with us?  He came knowing what He would have to face, and the pain He would suffer!  He came because He loved us and wanted to give us a precious gift we could not earn ourselves!  He wanted us to be able to live in His presence, but  sin had separated us and there was no way we would ever be able to take care of our own sinful state!  There was no way that we could pay for our own sins, and no way we could live a sinless life.  So a substitutionary payment was provided in our perfect Savior... the Light of the World!  His priceless gift is forgiveness of sin and a future with Him in heaven if we will but receive His gift!  It's free to US, but my friends, it was anything but free to Him!  

This Christmas, as we look around the world and see it literally falling apart all around us.... let's focus our minds on eternal things!  This world is groaning with sin, and we are seeing the result of that more and more all around us!  I believe time is short until the Lord returns for His children and takes us home!  The things of this world, while alluring and desirous, are all temporary and leave us feeling empty and looking for more.  Only that precious Gift who came in to the world as a baby born in a stable, wrapped in swaddling clothes and laid in a manger in Bethlehem can give our lives eternal meaning!  Only He can cover our sins and remove them as far as the east is from the west, and remember them no more!  Only He can declare us righteous, because of His shed blood on the cross, and His victory over death!  Only He can fill us with peace... He IS our peace, and we can face uncertain tomorrows knowing that we are at peace with God, and we have the peace of God in our hearts knowing our future is secure in Him!  Let's focus on these things and give Him all the thanks, honor and glory due Him!

If I don't post again before Christmas.... I wish you and yours a most Merry Christmas, and a blessed New Year!!!



Tuesday, December 9, 2014

From our House to Yours!


Hello friends! 

From our house to yours.... MERRY CHRISTMAS!!! 

Today I have a quick card to share with you using this month's ODBD release, Let it Snow, and some partial snowflakes from a past release, Sparkling Snowflakes.  I stamped and sponged my MB snowflake stencil with Tim Holtz Distress Ink in Iced Spruce.  I love the blueish green tones.  It reminds me of the retired Sage Shadow color from SU! which I miss very much.  My card base is Neenah Solar White and I cut my image panel with last month's die release, the Flourished Star Pattern die.  That gives the edge the tiny piercing that I could never do myself that evenly.  I popped the entire main panel up on dimensionals for a little extra pop, since the card is basically very simple.  I added the sentiment which is cut with a SB Ribbon Tag Trio die, and I added some tiny partial snowflakes from the Sparkling Snowflakes set and adhered with ribbon.  Simple and very doable in mass!

I hope you enjoyed my card today.  If you need a quick idea, this might help you get some made up in time to mail this year! :)

I have been focusing my mind and thoughts on the birth of our Savior throughout this Advent season.  I thought I'd share some Scripture with you today which gives the account of how Mary was first told by the angel Gabriel, that she would conceive a child, and that He would be great, and would rule His people.  There is so much to ponder in these verses, but what touches my heart today is Mary's response.... "Behold the maidservant of the Lord! Let it be to me according to your word. " I'm not sure I would have been that willing to be scorned for being pregnant out of wedlock in a time when that was an offense with dire consequences.  I'm not sure I would have wanted to start my marriage to Joseph already pregnant.  I'm sure I would have worried about what Joseph would think of me!  However, I think it was her heart that God found favor with, for her response showed her willingness to  do whatever God wanted her to do.  I hope you can take a couple moments to read Luke's account:


26 Now in the sixth month the angel Gabriel was sent by God to a city of Galilee named Nazareth, 27 to a virgin betrothed to a man whose name was Joseph, of the house of David. The virgin’s name was Mary. 28 And having come in, the angel said to her, “Rejoice, highly favored one, the Lord is with you; blessed are you among women!”[c]
29 But when she saw him,[d] she was troubled at his saying, and considered what manner of greeting this was. 30 Then the angel said to her, “Do not be afraid, Mary, for you have found favor with God. 31 And behold, you will conceive in your womb and bring forth a Son, and shall call His name Jesus. 32 He will be great, and will be called the Son of the Highest; and the Lord God will give Him the throne of His father David. 33 And He will reign over the house of Jacob forever, and of His kingdom there will be no end.”
34 Then Mary said to the angel, “How can this be, since I do not know a man?”
35 And the angel answered and said to her, “The Holy Spirit will come upon you, and the power of the Highest will overshadow you; therefore, also, that Holy One who is to be born will be called the Son of God. 36 Now indeed, Elizabeth your relative has also conceived a son in her old age; and this is now the sixth month for her who was called barren. 37 For with God nothing will be impossible.”
38 Then Mary said, “Behold the maidservant of the Lord! Let it be to me according to your word.” And the angel departed from her.

I am entering this in the ODBD Shining the Light Challenge, which is Christmas!

Blessings to you during this most special season, from our house to yours!

Friday, December 5, 2014

Happy Birthday Tickets!

ODBD stamps: Admit Three, designed by Grace Nywening

Hello my friends!  So gad you stopped by today!  I have something very CAS (clean and simple) to share with you today, which although not my usual style, I found fun to create and quick enough to actually be able to get several made for upcoming needs!  

I created this with the ODBD Dec. release, Admit Three .

I simply created a little border of birthday tickets from the Admit Three set, using different inks to coordinate with my chosen My Mind's Eye design paper, Hootenanny.  The inks I used are Primrose Petals, Daffodil Delight, and Marina Mist.  I added two ODBD Custom Beautiful Borders from a past release, and matted that on to my design paper, which I had pierced around the edges.  I popped this entire panel up on dimensions on a white card base.  I added a sweet multi-colored sheer bow to finish it off.

Today's blessing from the Word:
We can make our plans, but the Lord determines our steps.
Proverbs 16:9

I'm so thankful that my future does not rest in the plans that I make, for I would mess up many things in my life with my limited, finite understanding!  I can trust God who is sovereign and all knowing to direct my steps and know in full assurance that His plans for me are only for my good, and His glory.  

As we come to the end of another year, I hope we can all commit our ways to Him and trust His plans for us!

Thanks so much for stopping by!


Monday, December 1, 2014

Welcome to the ODBD Dec. Release!

ODBD Stamps: Let it Snow, designed by Grace Nywening

Hello friends!  Welcome to the ODBD December release! If you have not had a chance to view the entire release, you might want to pop on over to the ODBD Blog to see it all.  Here are the details for how you might win one of the prizes up for grabs this month:

Three randomly selected winners will each receive a $15 gift certificate to the ODBD Store, to be used toward the purchase of ODBD Stamps found in the "stamps column" of the website just for commenting on the Design Team cards!  You have until December 2, 2014 at 9:00 p.m. EST to leave your comments on the Designers Blogs for a chance to win!  The Winners will be posted on the ODBD Blog on December 3rd, so be sure to check back there to see if you won!
 *********************
Now on to my cards...
For the card above, I used the new Let it Snow set.  I stamped with Memento and colored with Copics, then went over the silver parts with a Wink Of Stella glitter pen.  I marked on the back of my paper where the bells were and then hand embossed them from the back to give them some depth.  I love the effect even though I can't really capture it with the camera.   I also used some past releases on this card, including the Sparkling Star Die and the Vintage Labels Dies.  I cut two of the stars, one from glitter paper, and one from white, then I stamped my sentiment and colored the star to match the designer paper, which was last month's release, the ODBD Christmas Paper Collection 2014.
For my next card, I used the gorgeous new Gilded Gate Die, and two of the mini sentiments from the Mini Tag Sentiments set.   I cut them with two different mini tags from the Mini Tags Die set.  I LOVE these little sentiments and I know I will use them over and over!  I also used an older stamp called Garden Path.  I stamped this beautiful image on watercolor paper with Archival ink and watercolored with Derwent Inktense pencils and then shaded and colored the sky with pastel chalks.  My picture seems to wash out the colors a bit but in real life I love how this came out and how perfectly the path lines up with the gate!  I cut the Gilded Gate from black card stock and tied the little sentiments to a tiny spray of flowers with some fine gold cording.  This card is 5x7" and is matted with metallic brushed gold.  The dp is from Hobby Lobby, Paper Studio.

ODBD stamps: Garden Path, Mini Tag Sentiments, designed by Grace Nywening


ODBD stamps: Garden Path, Mini Tag Sentiments, designed by Grace Nywening


To re-cap, here are the new ODBD products used today:

 194578916194578921194578939194578954

I hope you enjoyed my samples today!  

 Be sure to visit my DT sisters and leave a comment so you don't miss a chance to win!

Julie * Chris * Cathy * Lori * Dawn * Sandee * Paula * Angie * Lisa * Audrey 
Silke * Wanda * Grace * Gracie (Guest Designer)
Blessings,

Tuesday, November 18, 2014

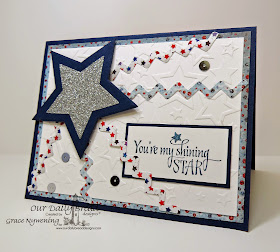
You're My Shining Star!


Hello friends!  Did you think I fell off the face of the earth?  LOL!  Well sometimes it feels like I have, but I assure you, I AM still here!  I have been busy making my "Dirty Dozen" cards for November, among other things!  If you are a Fan Club member on Splitcoast Stampers, you can see this month's gallery, including my projects HERE. Since this is something special for Fan club members only,  I'm not allowed to post those photos anywhere else for at least 6 months, but we'd love to have you come by and see what we've been up to this month!

However, today I did get in to my craft room, tried to clean up the mess from November's theme, and put together a couple simple cards.  I'm sure when you look at this card you're thinking this is NOT my style. You'd be right, but  I wanted a card for a boy, and I thought perhaps this month's ODBD release - Shine On along with the custom Sparkling Star Die might work.  I also am sharing just a little smidge of a sneak peek at some new designer paper called the Patriotic Paper Collection, which will be releasing Dec. 1.  I love the fact that a lot of the papers while patriotic in nature, also could be used for other things as well! 

For this card I cut a Sparkling Star die from Night of Navy and the next smaller sized one from silver glitter paper.  I used the sentiment from Shine on and the designer papers were used for the strips (which were cut with an EK Success Punch), as well as the mat. I embossed  the Neenah White layer with a Stars Embossing folder from Darice, and added a few silver flat sequins.  I think this works for a boy's card, don't you?

Well that's it for now.  I know my US friends are all getting geared up for Thanksgiving, and I am as well.  I've got my favors made and ready to put on the table.  If I could only clean now and have it still be clean then.... I'd be all set!  LOL!

Here's today's blessing from the Word:
"The steps of the godly are directed by the Lord.  He delights in every detail of their lives."
Ps 37:23 NLT

Thursday, November 6, 2014

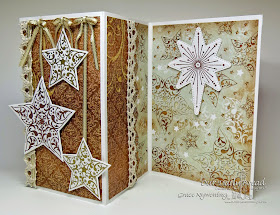
A Sparkly Star Z Fold


Hello friends!  I hope you all are doing well!

Today I have a Z-fold card to share with you, using the November release from ODBD!  I  used Shine On for my front star designs, and Come Let Us Adore Him for the star that's inside. I used the Custom Sparkling Star dies and the Splendorous Star Dies to cut my stars out.   The sentiment on this card can go on the middle panel or the back.  I heat embossed the stars in Gold Embossing powder and Copper Embossing Powder.  I also used the beautifully elegant 2014 Winter Paper Collection.  I "hung" my stars with thin ribbon and added bows and lace which is also laced with the same ribbon.

Here is the inside:

Thanks so much for stopping by!
Forgive my short post but between computer problems and being really busy right now, I'm just trying to get the essentials posted! Thanks for understanding!
Blessings,

Saturday, November 1, 2014

Welcome to the ODBD November Release!!!

ODBD stamps Come Let us adore Him designed by Grace Nywening


Hello friends!  Welcome to the ODBD November release!  I hope you have had a chance to see the full release, but if not, be sure to stop by the ODBD Blog!  We are sharing shining stars this month! 

Here's the Prize Information: 
Three randomly selected winners will each receive a $15 gift certificate to the ODBD Store, to be used toward the purchase of ODBD Stamps found in the "stamps column" of the website just for commenting on the Design Team cards!  You have until November 2, 2014 at 9:00 p.m. EST to leave your comments on the Designers Blogs for a chance to win!  The Winners will be posted on the ODBD Blog on November 3rd, so be sure to check back there to see if you won!

For my first card above, I used Come Let Us Adore Him, and the Flourished Star Pattern Dies, Splendorous Star Die, Shining Star die and the Sparkling Stars dies.  I also used a past release, Elegant OvalsI also used the gorgeous new Winter 2014 Paper Collection.

I started with a Neenah White base, layered on my dies from Neenah White and embossed the verse with silver embossing powder.  I also cut a Splendorous star and the Shining Star and several Sparkling stars from silver glitter paper.  I cut apart one sparkly die cut from the Flourished Star Pattern die set and glued it back together on the white star so that the tips of the points would show behind my sentiment layer.  (In other words, I made it a little bigger to make a pretty frame for my sentiment panel).  I finished it off with some tiny stars from the Sparkling Stars set and a silver sheer bow.

For my second card below, I made a Z fold card.   I used Come Let us Adore Him, heat embossing with a Copper Glittered embossing powder.  I cut them with Splendours Star Dies and the Flourished Star Pattern die.  (These dies layer beautifully together).   I added some tiny stars from the Sparkling Stars set as embellishments, and one copper Shining Star die cut.   The paper is the beautiful new 2014 Christmas Paper Collection.  The base is a sparkly copper card stock.  Some pearls and pearl flourishes finished it off.


ODBD stamps Come Let Us Adore Him, designed by Grace Nywening


Here is another angle.


I lined up my front star with the inside star so they exactly line up when the card is closed.  Below is a close up of the sparkly copper embossing powder.  I hope you can see a bit of the sparkle!


Please be sure to visit my DT sisters so you don't miss a chance to win a prize! 

Chris * Lori * Paula * Cathy * Dawn * Sandee * Angie * Lisa * Wanda * Grace *Silke * Sabrina 

Thank you so much for stopping by!!!

Monday, October 27, 2014

It Came Upon a Midnight Clear

ODBD stamps Midnight Clear Background, God's Timing, designed by Grace Nywening

Hello sweet friends!  I hope you are all doing well!!!

I am popping in to share a card I made using several of this month's ODBD new releases, and for a few challenges. 

 I used the ODBD Midnight Clear Background and inked first in Baked Brown Sugar, then dabbed off the brown on the snowflake edges with a paper towel and inked with Coastal Cabana.  I knew I wanted to add a little glitter to the edges so I just didn't worry too much about having the transitions perfect from the brown to the blue. I added some T Holtz white paint and some Recollections clear glass glitter all around the snowflakes.   I stamped my clock from the God's Timing set, using the Matting Circle Dies, and the Circle Ornament Dies to cut it,using  Baked Brown Sugar cs which I sponged with Crumb Cake. I cut three of the ODBD Peaceful Poinsettia Dies from vanilla cs and then spritzed them with Tattered Angels Candy Apple Red glimmer mist. I love how the gold glitter seemed to settle in to the embossed parts of the poinsettia! After arranging everything, I added Gala Glitz (Art Glitter) to the centers. LOVE this stuff! It's a combination of coppery beads and glass glitter. All the greenery and flourishes are from ODBD Fancy Foliage die set.

I am entering this in the ODBD Shining the Light Challenge, which is  a Scripture inspiration challenge.
Be inspired by this verse:
Ecclesiastes 3:1: To everything there is a season and a purpose for every time under heaven.

I hope you enjoyed this card as much as I enjoyed making it!  The colors were dictated by a color challenge I played in on SCS but I ended up liking how it came out.  While I'm on the subject of Splitcoaststampers... I have been highly honored to be asked to be on the Dirty Dozen... the 12 gifted design team members for Splitcoaststampers!  While I cannot share the cards I have created for this special gallery for 6 months, I can give you a little  a link to the gallery where they can be viewed, but only if you are a fan club member there. Each month we are given different themes and we create 6-8 cards for that theme, and it's one of the special things done for fan club membership. If you are a fan club member, you can view the gallery HERE.

Today's Blessing from the Word:
Heb. 4:16 KJ
Let us therefore come boldly unto the throne of grace, that we may obtain mercy, and find grace to help in time of need.

Blessings, 

Friday, October 24, 2014

October in review!

ODBD Stamp Midnight Clear Background, designed by Grace Nywening
Hello sweet friends!  I hope you are all doing well!!!

Today we are taking a look back at the ODBD Oct. release!

For my card, I used the Midnight Clear Background stamp, and the gorgeous ODBD Custom Peaceful Poinsettia dies, along with past releases of Fancy Foliage Dies, and Angel Wings Dies.  I also used the Spellbinders Flourish Trim die.  I cut it and the Angel wings from vellum, sponged with blue and then added my MS Snow Glitter, which is quite chunky and very sparkly.  The card base is Vanilla and is embossed with a Darice corner flourish folder. I stamped the Midnight Clear Background with SU! Midnight Muse Ink.  In real life I love how this came out and I know just who is going to receive it this Christmas!


Please be sure to check out my DT sisters who have created samples for you today!

 Grace * Paula * Chris * Lori * Julie * Sandee * Cathy * Dawn * Stacy * Wanda * Audrey

You can also see all the projects on the ODBD Blog.

Thanks for stopping by!

Blessings,

Tuesday, October 21, 2014

Poinsettia Ornament and Mini Tutorial!

'
ODBD Stamps and dies, designed by Grace Nywening with tutorial

Hello sweet friends!  I wanted to share a really fun project I've been working on.  I really love how it came out, but for the life of me I cannot get one photo that really shows it well.  I keep getting a glare on the ornament, and if I remove enough light to not have that glare, then the image inside appears flat. 

I thought I'd share a brief tutorial on how to create this ornament. I do not have photos of every single step, but I'm sure you can figure out what I don't have shown.  This is a pretty basic project.

Here is a basic Materials List:
ODBD Matting Circle Dies (panels inside ornament)
Clear Plastic 2 piece ornament (I got mine at AC Moore and it's about 3 1/4" at widest part)
Light weight watercolor Paper (Pacon Artist Watercolor student grade 192g used here)
Designer Paper of Choice for background
Gold Design Paper
Light weight cardboard (cereal box weight used here) 
Inks of choice: SU! Cherry Cobbler, Old Olive and Always Artichoke used here
Glass Glitter, beads or pearls for center of flowers (SU! Champagne glass glitter used here)
Piercing Tool
Embossing Stylus and Mat
Tombow Metal Glue
VersaMark and gold embossing power (fine details from Ranger used here)
Clear Thread or fishing line
Decoration for edges of ornament if desired (optional - Best Creation Gold Peel off Stickers used here)
Ribbon of choice 
Pearls or flourishes of your choice

Using Watercolor paper, die cut and eboss 2 complete sets of the Poinsettia Flowers

Cut and emboss 6 holly leaves from Circle Ornament Die Set, and spritz all flowers and leaves with water.


Watercolor the poinsettias and leaves as desired.  I colored both sides because I wasn't sure if you'd be able to see the backs of any of the petals since I was making a front and back for this ornament.  Now that I've completed it, I'd say just the front would be fine.  I used a wet mixture of paints and since poinsettias often have more than one shade on them, I tried to add a little green to some edges, and left some parts more light pink while adding in some areas of darker red. I didn't take any great care in the painting... it won't really matter much!  Set aside to dry.

Once dry, or close to dry, using a medium-large sized embossing stylus and an embossing mat, begin shaping the petals as you like them.  The more you work the petals, the more you will kind of lose the detail of the embossed die cuts, but you can always go back and add them in again if desired. (I did have to do that, and I used a small embossing stylus for that)   Pretty flowers CAN be made simply by rolling the petals over a piercing tool and giving a slight bend in the middle. If that's how you do it, you won't lose that embossed detail on the petals and it will be take less time.   It just depends on the look you want.

Using Tombow Mono Metal Glue, layer up your poinsettias as desired.  (You will have 2 full layered poinsettias)  Using glass glitter, beads, pearls or whatever you choose, adhere decorative centers to flowers and let dry.

Die cut a circle from light cardboard and  2 pieces of gold with the largest die from the Matting Circles Die set.
Die Cut 2 pieces of your chosen design paper using with the second largest size in the Matting Circle Die set.

With VersaMark, stamp the "Noel" in the upper right corner of both pieces of the design paper.  Adhere the gold to both sides of the cardboard circle.  Adhere the design papers to each gold piece.  This gives you a decorative background for the front and back of your ornament.

With your piercing tool, punch a hole through the top of your cardboard/paper where you want to attach the clear thread "hanger".  I was able to almost avoid the design paper and just pierce the gold as you can see below.


Take your dried Poinsettias and adhere them to each of the lower left corners of your ornament.  Tuck in the holly leaves and adhere. Add pearls if desired. (Paper flourishes would work well too).   Using a sewing needle, pass your clear thread through the hole and tie knot.  Leave tails on the thread that will allow you to tie them to the ornament hanger itself.


Now, take the largest half of your ornament, and pass the clear thread through the hole at the top of the ornament.  Draw it up until your panel fits perfectly in the middle of the ornament, and tie a double knot.  I actually don't trust clear thread to not come undone so I added a little blob or hot glue to hold it there.  While working with the ornament at this point, you might find it easiest to use a small cup to hold it for you.  Now fit the two halves together and tie knot again.


Above are the stickers I used, and you can see how I adhered them right along the seam of the two halves.
Now you can tie your gold cord or whatever you want to use as a hanger.  If you want to add a decorative sheer bow, you can do that now, and you are done!  The hardest part of this is getting a photo that doesn't distort the sphere, and does not have glare!  LOL!

Here are a few more angles of the ornament:


Below you can see the side of the ornament and see that the back and the front are the same and decorated the same.


I hope you'll give this a try.  It was super fun and really is a quick project once your poinsettias are painted, shaped and dry. I think this would be a nice little gift.

Thanks for stopping by!

Blessings,

Friday, October 17, 2014

Merry Christmas Center Step!

ODBD stamps: Christmas Pennant Swag, designed by Grace Nywening

Hello my friends!  I hope you are all doing well!  We have just had some pretty rough storms moving through here as I type this, but no serious damage, PTL!   Anyhoo... it made for a perfect day to get in to my craft room and make another card with the just released ODBD Christmas Pennant Swag.  I also used the ODBD Custom Pennant Swag Die to cut these pennant swags, and also the ODBD Custom Pennant Dies set for my trees!  I used the ODBD Christmas Paper Collection 2013 for my scraps and the strips on the sides.  I embossed the white panel with a Darice snowflake folder, and just arranged my "trees" (aka upside down pennants) and popped them up with foam tape.  Super easy, super quick! 

I hope you have a wonderful day!!!

Today's Blessing from the Word:

John 14:27 
 Peace I leave with you; my peace I give you. I do not give to you as the world gives. Do not let your hearts be troubled and do not be afraid.

Monday, October 13, 2014

Welcome to ODBD's SECOND OCT. Release!

ODBD stamps: Poinsettia Ornament, Christmas Pennant Row, designed by Grace Nywening

Hello friends!  Welcome to a Surprise Second ODBD Release for October!

Just as in the first release, Kelley is giving prizes for this second release! 

Three winners will be randomly chosen from the comments left on the designers blogs to receive a $15 Gift Certificate to the ODBD Store, to be used toward the purchase of ODBD Stamps. You have until October 15, 2014 at 9:00 p.m. EDT to leave your comments on our Designers Blogs for a chance to win!  The Winners will be posted on the ODBD Blog on October 16th, so be sure to check back there to see if you won!
For my card today, I used the Oct. 1 release, Poinsettia Ornament, and I coupled that with today's release,  Christmas Pennant Row, which fits perfectly the previously released Pennant Row Dies.  I cut my Poinsettia Ornament out with the Oct. 1 release, Matting Circle Dies, and then matted that with brushed gold which I cut with a previous release, Circle Ornament Dies.  I also used the ODBD Beautiful Border Dies.  
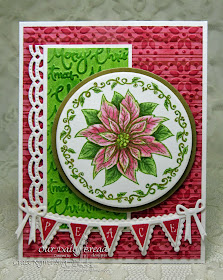
To create this card I stamped the poinsettia with Memento and colored with Copics.   I used R81, R85, RV000, G20, G43,  G94, Y11.  I also used a gold Wink of Stella Glitter Pen to add sparkle to the poinsettia, but unfortunately I can't seem to capture that on the photo. I cut the ornament with this month's Matting Circle dies.  I used some Martha Stewart brushed gold to mat the ornament, cutting it with a past release, Circle Ornament Dies.  I used a base of Neenah Solar White, and then some design paper from an My Mind's Eye 6x6 pack Tis the Season, and from another MME pack, Merry Little Christmas.  I then embossed both papers with Sizzix folders, and then rubbed with SU! inks direct to the embossing.  I cut a Beautiful Border from white and matted the green panel with it, and added that to the red.  Then I stamped the PEACE banner with Primrose Petals ink, cut with the ODBD Custom Pennant Row Dies, and added to the bottom of the card.  The die row was longer than I needed or fit this orientation of the card, so I cut off the outside two pennants and cut the little white bow off, and then added that back on to the end of my pennant row.  The poinsettia panel is popped up on dimensionals.

Here is the new set I used from this release today:
 
Here are other October Release products I used today:


 Thank you so much for stopping by today!  Don't forget to visit each of the eight designers listed below and leave a comment for a chance to win one of THREE prizes!
Here are the links to the other designers participating in this hop today:

 Grace * Chris * Lisa * Dawn * Lori *  Sandee * Sabrina * Angie

Just one more thing to mention!  ODBD is also offering a NOVEMBER PRE-ORDER SPECIAL!  You can read all about it HERE!

Friday, October 10, 2014

A Sneak Peek at a SECOND OCT. RELEASE at ODBD!

ODBD stamps: Christmas Pennant Swag, Joy Tree, designed by Grace Nywening


Hello friends!  I'm popping in today with a sneak peek at a special second release coming to Our Daily Bread designs on Oct. 13!  The new release I'm sharing today is the Christmas Pennant Swag.  It is designed to fit the previously released Pennant Swag Die.  I also used a past release, Joy Tree.  I loved this tree and decided to use some fun shades of pink, red and green to color it with SU! markers.  I colored the whole stamp, then huffed a bit to make sure there was enough moisture to stamp well, and I do like how it came out.  I did a little hand doodling on the larger words to outline them.  (Did you do that when you were a kid?  I always did!)

Anyway... I stamped the Joy to the World Pennant Swag with a Colorbox Pigment Ink, and immediately heat embossed with Diamonds and Pearls for a shimmery effect.  Because that has so much shimmer, I decided to heat emboss my tree panel as well.  I used clear embossing powder to which I've added Dazzling Diamonds for a little sparkle.  It's hard to capture sparkle in a photo, but the little specs you see on the white panel are the dazzling diamonds. Here's a close up that hopefully shows it better. 


The card base is Neenah Solar White, and the design paper is from My Minds Eye Merry Little Christmas and Tis the Season 6x6 packs. 

Hope to see you back here for this second release!  Eight designers will have samples for you and there will be prizes for this release too.... so come play along for a chance to win!

Blessings,

Wednesday, October 8, 2014

Peaceful Poinsettias


 Hello friends!  I hope you are doing well!  I have been snowed under this week, but I finally got a card made today to share with you here.  I used the newly released Peaceful Poinsettias from ODBD, as well as a past release, Worship the Lord.    I cut and embossed  three sets of the poinsettia dies from white card stock, sponged with Brilliance Platinum Planet Pigment ink, spritzed with water and then began shaping them with an embossing stylus on an embossing pad.  I loved the shimmer of the platinum ink.  I stamped the word Rejoice from the Worship the Lord set and embossed it with a soft goldis color of embossing powder, but there is no name on the bottle so I can't tell you what it is.  I cut that panel with a Spellbinders Fancy Tags 2 die from white cs.  For my base panel, I used a T Holtz embossing folder (Sizzix) and rubbed the negative side of the folder with the same Brilliance ink, then ran it through my grand calibur.  I love this effect!  I mounted that on a white base, arranged my poinsettias, added some white flourishes from the  Fancy Foliage Die set, and some tiny pearls.

I am entering this in the current Shining the Light Challenge over on the ODBD Blog.  It's anything goes with ODBD stamps!  Hope you can play along!

That's it for me today.  I'm sorry I'm a little busy at the moment, but I'll do my best to keep some samples coming for you!  

Today's Blessing from the Word:

James 5:16
The prayer of a righteous man is powerful and effective!

Thanks so  much for stopping by!!!

Blessings,  

Monday, October 6, 2014

Happy Birthday Kelley!


Hello friends!  Today the ODBD Design Teams have joined together to do a surprise Birthday Blog Hop for ODBD owner, Kelley!  Her actual birthday is tomorrow, so maybe THIS year, since we are posting a day early in order to not double post on the ODBD Blog tomorrow, maybe she will be surprised!

If you arrived here from the talented and sweet Sandee's Blog, you are in the right place! If not you might want to start at the ODBD Blog so you don't miss anything!

I have used one of my favorite ODBD sets, Birthday Blessings for my image, and Birthday Doily for my sentiment.  I have also used the ODBD Custom Doily Die, Beautiful Borders Die, and the smallest tag from the ODBD Custom Recipe Card and Tags Die set.  The designer paper is Garden Party (Pebbles) and the base is Neenah Solar White.  I colored the image with Copics and fussy cut it out so I could mount it on the doily.  I used Wink of Stella Gold to trim parts of the cup and saucer, in honor of my grandmother's china, a beautiful Haviland china with a dainty pink floral pattern that's trimmed with gold.  I now have that china and it's so thin you can actually see through the cups, but I treasure every single piece!  This image often makes me think of all the feminine china pieces she had, and what a beautiful table she set! 

Anyhoo.... Happy Birthday Kelley!!!  I hope you have a wonderful Birthday celebration, and that God blesses you with many more healthy happy years!!!  The "breadsticks" all love ya!!!

Here are the ODBD products I used today:

BIRTHDAY BLESSINGS

 G584 - BIRTHDAY DOILY

 CSBD62 - DOILY DIES

 CSBD51 - BEAUTIFUL BORDERS DIES

 CSBD31 - RECIPE & TAGS DIES

Here are the Links to the girls participating in the hop:  So from here you'll hop to Wanda's Gorgeous Blog!  If for any reason any links are not working, just skip to the next one on the list!!


Grace (That's Me)


Blessings,