Saturday, September 28, 2013

A Sneaky Peek giving Glory to God!


Hello friends!  I hope your weekend is off to a great start!  We have outdoor work planned and are just waiting for things to dry up a bit, and then to work we go!  However, when I looked at the Inspiration Challenge on SCS today, I decided to make a quick card for it.

While I just loved the shabby cottage feel of the Bella Cottage site, I was wondering how I could manage to give you a sneak peek of one of many gorgeous sets coming your way at ODBD on Oct 1... and then I stumbled on this chalkboard print and I knew what I wanted to try. I thought... I wonder if I could stamp this image, called Glory to God, on gold. I tried it with Stazon and it was very light. Then I tried Versafine and tried to dry it with my heat gun, but that didn't show up either. Then I put black embossing powder on it and voila... I had the look I wanted. Since most of the things on the beautiful Bella site have soft tones of pink and ivory, I looked for more inspiration and found it HERE. These one of a kind poinsettia vintage plates were perfect! I went through my Christmas paper and found these vintage papers from Paper Studio. The flourish and leaves are cut from brushed gold with the ODBD Custom Fancy Foliage Dies and the vanilla flowers are Prima.

Thanks so much for looking!  You are going to love this new release!  It's so varied with both fall and Christmas themes... and I can't wait to show you more!

Have a blessed weekend!!!

hugs,


Wednesday, September 25, 2013

Noel in Blue and White


Hello friends!  I'm popping in with another Christmas card for you.  This is a super CAS card I made for a class sample, using ODBD's Custom Fancy Ornament Dies, and Fancy Foliage Dies.  The "Noel" sentiment is from a past release, Cardinal Ornaments.  The designer paper is BoBunny and I scored on white card stock around the perimeter of the designer paper for a little extra texture and interest without much extra time!  I added an Inkadinkadoo sparkly white cord to hang my ornament from the white pine bough, and the ornament is popped up on thin dimensionals.

Here are the ODBD  products used on this card:


Before I go, I wanted to let you go, I want to let you know that there is a GREAT SALE going on for the rest of this week!  To read all about it, please see THIS POST!


 I am entering this in this week's ODBD Shinning the Light's Anything goes with ODBD Stamps challenge
Thanks so much for stopping by!


Monday, September 23, 2013

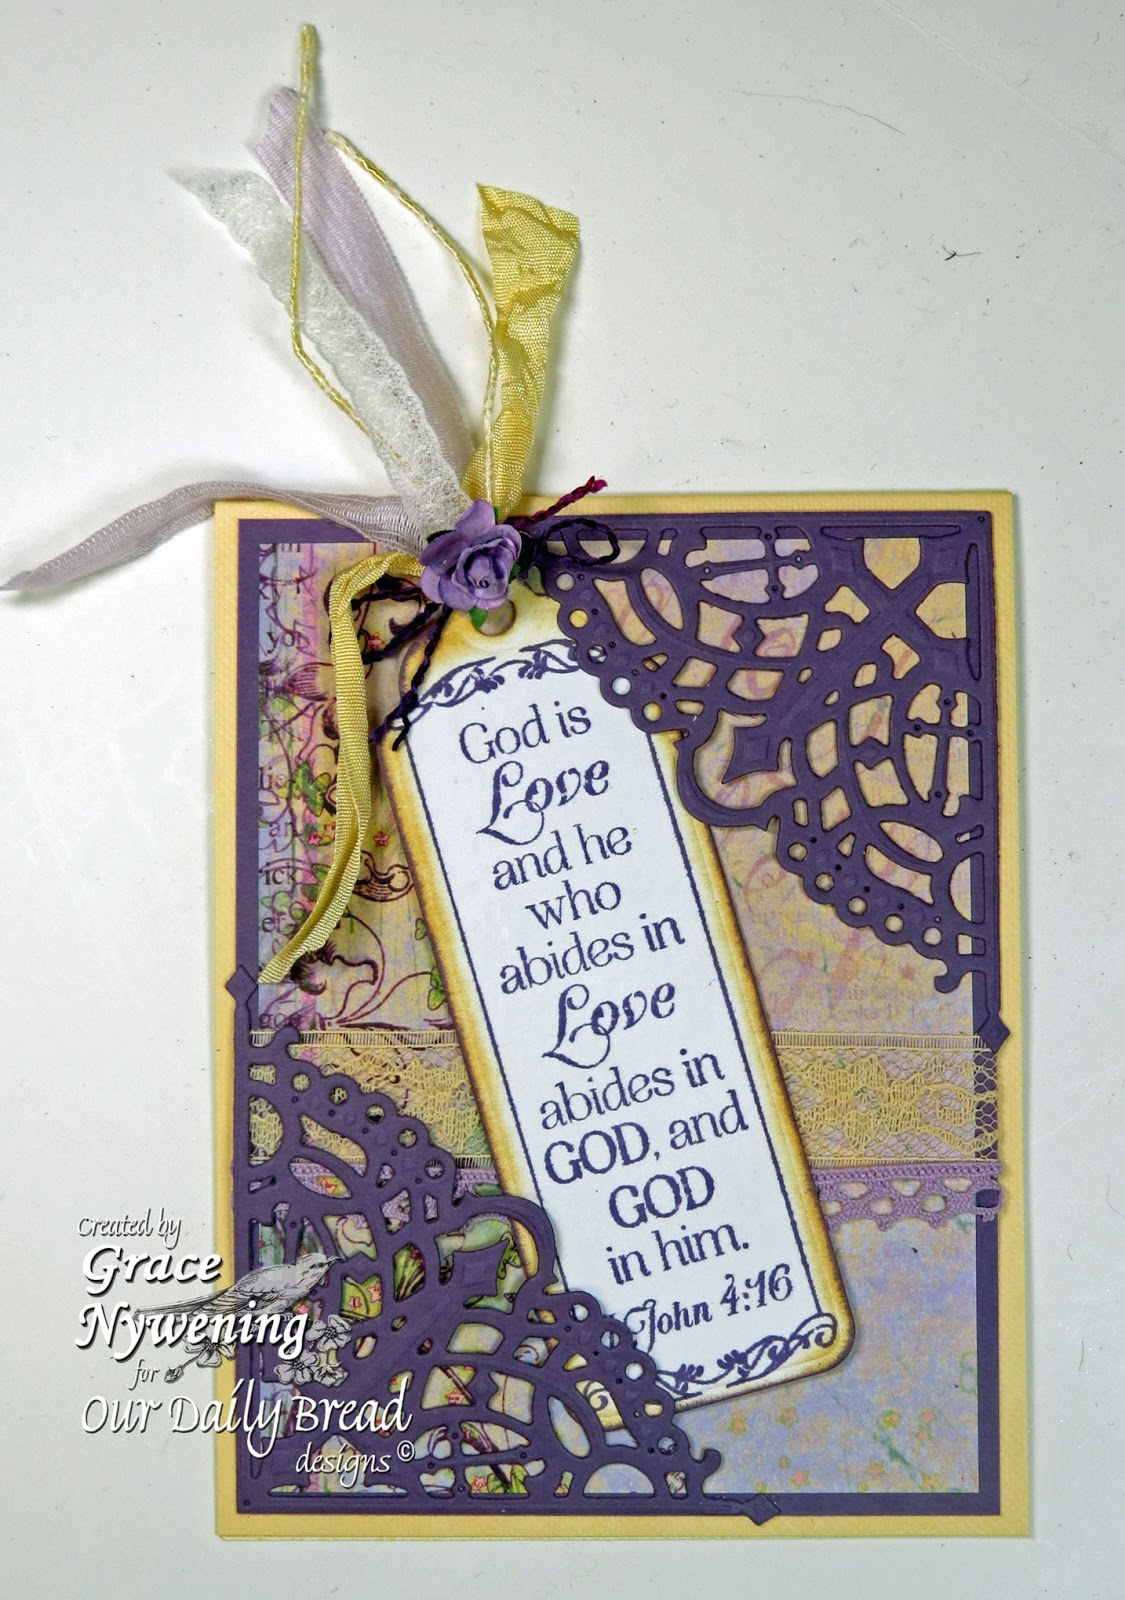
God is Love Bookmark Card

Hello friends!

I'm sharing a card I made as a sample for the ODBD Packaging of these AWESOME Dies!  This set has a wonderful cross motif that works so beautifully with the Christian sentiments and Scriptures.  The colors were given to me as a requirement, so this is what I came up with.  I used Love Scriptures and the ODBD Custom Bookmark Dies, as well as the newly released ODBD Custom Decorative Corner Dies 

I started with a Bazzill base in yellow and added some Prima Lilac Breeze designer paper and a purple layer as a matting and from which I cut the corner dies. I added some yellow and lavender lace to my card base.   I stamped the verse with T Holtz Dusty Concord ink and sponged with Scattered Straw.  I added some fibers, seam binding and lace, along with a tiny purple rose and tucked the bookmark in to the lower corner.  I have tons of fun ideas for these dies so hopefully I will have time to show you more soon!


I hope you are enjoying this month's release as much as I am!  I'm loving getting ready for Christmas with the gorgeous ornament dies and stamps.... but these dies are going to be so versatile year round... so I'm loving that!!!   

Here are the ODBD products I used:


Thanks for stopping by!  I just love knowing you were here!!!

Blessings,

Friday, September 20, 2013

Emerald on Gold for Christmas and a Look Back!

ODBD stamps, Jingle Bells, Holly Wreath, ODBD Custom Cathedral Window and Border Die, Grace Nywening designer
Hello friends!  I hope you are all doing well!

Today we are taking a look back at Our Daily Bread Designs  September Release. 
  This image is from Holly Wreath, and the sentiment is from Jingle Bells.  I also used a border die from the ODBD Custom Cathedral Window and  Border die set. 
I used a vanilla base and matted with brushed gold.  I stamped my image on brushed gold with VersaMark and heat embossed with Pearlescent Emerald Green embossing powder from Stampendous.  I used a Cuttlebug embossing for the holly stripes in the background, and a Sizzix folder for the poinsettias on the smaller panel.  I hand cut my sentiment to place it on an iridescent ribbon that looks sometimes green and sometimes red.  I added little gold pearls (Recollections) to the wreath and kept the card simple.  I can't capture it well in the photo, but I do love how this card came out in real life. 


ODBD stamps, Jingle Bells, Holly Wreath, ODBD Custom Cathedral Window and Border Die, Grace Nywening designer

 Here are the ODBD products used on this card:


For more inspiration using the September Release be sure to visit the ODBD Blog 
AND... please stop by my sister design team blogs for all the details on their beautiful artwork: 


Thanks so much for stopping by!!!

Blessings,


Thursday, September 19, 2013

Granny Smiths mean GREAT pie!


Hello friends!

I've been on the most wonderful vacation!  Our entire family rented a cottage on the Outer Banks and spent the whole week there!  The weather was GREAT and we all had a wonderful time!  I always hate to say I'm away from home on line before the fact, because you just never know who is looking... if you know what I mean.  However, now we are back and I'm over-flowing with gratefulness to God for allowing us to have such a great time!

Anyhow... for now... I want to share a card I made for a sketch challenge on SCS.  This uses this month's ODBD release, Apples, as well as the mini image that matches it from the Garden Minis set.  I made my background layer with the mini and just lightly colored the small images to match my larger one.  I left off a sentiment to allow a more personal sentiment on the inside when I send it.  The card is A2.  The base is Kraft, the designer papers are We R Memory Keepers Anthology and Memory Box Twiggy.  The foliage die cut is Spellbinders.  One little button and twine are the only embellishments, but give it an earthy feel.  Now I really want to go make an apple pie!!!

I love fall because of the beautiful colors... the brisk temperatures, and the yummy fruit and veggies of the season!  Apples are definitely near the top of that list!  Hopefully soon we will take a trip to the mountains and find some locally grown apples! 

This week's Shining the Light Challenge is to use Fall Colors. I am also entering this in:
 

Blessings,

Wednesday, September 18, 2013

A Very Merry Vintage Christmas!

ODBD Stamps, Jingle Bells, ODBD Custom Fancy Ornament Dies, Grace Nywening designer
Hello friends!  I hope you are all doing well! 

Today I'm sharing a Christmas card made on the vintage side! :)  I think these papers and colors give it a  vintage feel.

I used a sentiment from the Jingle Bells set, and paired that with two of these GORGEOUS ODBD Custom Fancy Ornament Dies!  I used designer paper from My Mind's Eye Lost & Found Christmas pack, some brushed gold and True Thyme card stock for my papers.  I also used a Spellbinders A2 Scalloped Border and Fancy Framed Tags 2.  The embossing on the gold layer is done with a Craftwell Regency A4  embossing folder.  I embellished with a sheer burgandy ribbon and some gold cording for hanging my ornaments.

To show another take on the same ornaments and stamp set.... here is another sample...

ODBD Stamps, Jingle Bells, ODBD Custom Fancy Ornament Dies, Grace Nywening designer
For this one, I used Blue Bayou for a base and layered on designer paper from BasicGrey called North Country.  I used silver glitter paper to cut my ornaments, embossed my sentiment with glittery silver embossing powder, and cut with a Spellbinders Fancy Framed Tag.  I cut my ornament hangers from silver mirrored paper, and added silver cord to hang the ornaments with.  I punched the top panel with a Martha Stewart punch and added a little silver ribbon at the bottom.  Same elements... different look. I don't know if this card looks vintage in the photo, but in real life, it kind of does!  I LOVE these ornaments and I think many of my Christmas cards this year will be made with them! 

Here are the ODBD products I used:

Thanks so much for stopping by!  I love knowing you were here!  Also... I sometimes have questions left in the comments and I love to try to help you whenever I can.... so please be sure to either check back to the post you left the comment on to see if I put the answer there, or include an email address so I can get back to you!  You can also email me directly from the link in my side bar that says "email me".  I will then be able to answer your question and know you got to see the answer!  Often when I try to go to your profile, you have no contact information, so I have no way to answer your question except if you either give me a contact address, email me, or check back on the post and/or comments to see if I have answered you there.  I really do my best to address every question to the best of my ability!

Blessings to you!

Sunday, September 15, 2013

Fancy Wedding Card and mini-tutorial!


Hello friends!

Today I have a fancy wedding card to share with you, using September's release of the ODBD Custom Decorative Corner Dies.  I love these dies so much!  Here is what you get:

As you can see... there's one larger corner with a heart theme.  There is also a smaller corner die with a cross theme.  I love them both!!!  So today I wanted to share one idea for the larger heart die!

I cut and embossed two corner die cuts from white, and two from my lavender design paper, which is from an older Heidi Grace pad.

 I cut my lavender designer paper 5 3/4" x 11 1/4".  I scored along the long side at 2 7/8" and 8 3/8".  After scoring and folding the two outside panels inward, it leaves a center card approximately 5 5/8" wide (the extra 1/8" is taken up in the folds).  I then positioned my ruler on the mid-point on my side panels, and penciled a line from that mid-point to the fold line at the outside edges of the center square.  I cut away the triangles that were penciled in, leaving me with two triangle panels that wrap around my card.  I positioned the two white corner dies on each of these triangles. This is what you have after cutting your triangles and adhering the white die cuts.


 On the inside of the card, I cut a yellow piece of design paper from a Prima pad, and adhered it to the inside of the double sided lavender paper.  I then added the two lavender corner dies I had cut to form a pretty mat for my setiment panel.  The sentiment panel is the ODBD Custom Quatrefoil Design Die, and I stamped the verse from the Love Scriptures stamp set with Dusty Concord T Holtz Ink.  I sponged the edges of this panel with Scattered Straw ink and popped it up on thin dimensionals.


I then created a belly band to keep the card closed and make a pretty presentation.  I used sheer lavender ribbon from Michael's and made a band and bow.  I tied on a tag with a sentiment from To The Love Birds, and cut it with the large tag from the Recipe Card and Tags Die set.  This easily slips off yet is snug enough to keep the card closed.


Thanks so much for stopping by!  I love knowing you were here!  It truly makes my day!

Blessings,