Saturday, November 30, 2013

A Sneaky Peek!


Hello sweet friends!  I hope all my American friends had a happy Thanksgiving and that you didn't eat too much turkey! LOL!  I know all of us here did!!!

I wanted to share a quick sneak peek with you because I just love the new stamps from Our Daily Bread designs that will be releasing tomorrow and had to share some with you!  This card was made using a  set called Ornate Borders and Flowers, the ODBD Custom Ornate Borders and Flower Die, and also from a past release, Decorative Corners dies.  I also used a past release,  Mini Tags 3 for my sentiment.  Don't you just love how these new borders layer with eachother? The dies cut these borders beautifully and I know you will love these new sets.  I can't wait to show you more!!!


My ink for this card is VersaColor Pigment ink and I used this gorgeous designer paper from Prima called Meadow Lark on a base of white.  I added a little bling, some Wild Orchid flowers, and a white silk bow from May Arts. 

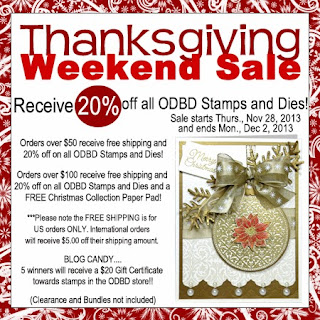
I will keep this short since I still have my family here and am on the run, but I hope you'll stop back tomorrow to see the entire release, as it is just beautiful!!!!  I also wanted to mention that ODBD is having a Thanksgiving
Weekend Sale and it's AWESOME!

  So check it out at THIS POST!  It's good through 11pm Dec. 2!!!

'Til then.... Blessings,

Thursday, November 28, 2013

A Thanksgiving Day Proclamation!

Happy Thanksgiving to all my American friends (and to all who are thankful)!

Last Saturday, my husband was at the Shiele Museum reenacting a Colonial Thanksgiving.  He will be a messenger (the means by which news was sent in the 1700''s)  sent to read the Proclamation of Thanksgiving given by then President George Washington.  I thought you might enjoy reading it because you won't find it in today's history books, nor will you hear it from our White House. 

Oh how far we have fallen!

Thanksgiving Proclamation

Issued by President George Washington, at the request of Congress, on October 3, 1789
By the President of the United States of America, a Proclamation.
Whereas it is the duty of all nations to acknowledge the providence of Almighty God, to obey His will, to be grateful for His benefits, and humbly to implore His protection and favor; and—Whereas both Houses of Congress have, by their joint committee, requested me “to recommend to the people of the United States a day of public thanksgiving and prayer, to be observed by acknowledging with grateful hearts the many and signal favors of Almighty God, especially by affording them an opportunity peaceably to establish a form of government for their safety and happiness:”
Now, therefore, I do recommend and assign Thursday, the 26th day of November next, to be devoted by the people of these States to the service of that great and glorious Being who is the beneficent author of all the good that was, that is, or that will be; that we may then all unite in rendering unto Him our sincere and humble thanks for His kind care and protection of the people of this country previous to their becoming a nation; for the signal and manifold mercies and the favor, able interpositions of His providence in the course and conclusion of the late war; for the great degree of tranquillity, union, and plenty which we have since enjoyed; for the peaceable and rational manner in which we have been enabled to establish constitutions of government for our safety and happiness, and particularly the national one now lately instituted; for the civil and religious liberty with which we are blessed, and the means we have of acquiring and diffusing useful knowledge; and, in general, for all the great and various favors which He has been pleased to confer upon us.
And also that we may then unite in most humbly offering our prayers and supplications to the great Lord and Ruler of Nations, and beseech Him to pardon our national and other trangressions; to enable us all, whether in public or private stations, to perform our several and relative duties properly and punctually; to render our National Government a blessing to all the people by constantly being a Government of wise, just, and constitutional laws, discreetly and faithfully executed and obeyed; to protect and guide all sovereigns and nations (especially such as have shown kindness to us), and to bless them with good governments, peace, and concord; to promote the knowledge and practice of true religion and virtue, and the increase of science among them and us; and, generally, to grant unto all mankind such a degree of temporal prosperity as He alone knows to be best.
Given under my hand at the City of New York the third day of October in the year of our Lord 1789.
Go. Washington


Happy Thanksgiving to all my American friends!

Blessings,


Saturday, November 23, 2013

A Beautiful Gift and more gifts to come!!!


 Hello sweet blogging friends!  Today I wanted to share a special gift that arrived at my house several days ago and I just have not had time to post it until now!  This beautiful package came from my sweet sister in Christ, and blogging friend, Sarah George!  It made it's way all the way from India to NC and I am just thrilled with the beautiful goodness in this gift!

I had decided some time ago to choose someone from my faithful visitors who leave me comments to gift with some fun goodies, and I chose Sarah.  She says she's still new to stamping but I think you'll agree that she does absolutely BEAUTIFUL work!  She made me two cards using some of the things I had sent her, and these AWESOME quilled tags!  These are very special to me because while I bought the supplies to try quilling a couple years ago, I really never got in to doing it and I sooooo love the beautiful work that can be done with strips of paper!  Sarah has made these tags and I just can't wait to use them!  Then in the back of the photo you can see the most gorgeous clutch bag with so much delicate stitching on it!  I just love it!!!

Sarah... thank you from the bottom of my heart!  I certainly did not send a gift to get a gift, but I do want you to know how very much I appreciate your thoughtfulness!!!  

I hope you'll stop by Sarah's blog and enjoy some of her beautiful work!

My idea is that every so often, I will be continuing to select one name from my regular commenters, and sending them a little  package of love, because who doesn't enjoy new toys to play with?  So you never know when I'll be contacting you for your mailing address... I didn't want it to be about getting new people to follow my blog to get blog candy,  and then never come back.... I wanted it to be about you, the ones who visit frequently, and leave the most amazingly encouraging comments!  It's also about passing on the blessings!  God has given me much, and I want to pass that along!  So... if you are reading this and leave comments along the way... you could be next!  :)

Thank you!!!

Blessings,


Friday, November 22, 2013

Taking A Look Back that's Sparkly, Elegant and Very Mailable!


Hello friends!  I hope you are having a wonderful week!

 Today we are taking a look back at Our Daily Bread Designs November Release

I'm sharing another Christmas card I made using this month's release from Our Daily Bread designs: Vintage Pattern Ornaments, and Vintage Pattern Mini 2.  I also used the Circle Ornament Dies. The card shape is Spellbinders Grand Labels 23, and the tag is cut with SB Grommet Tags.

For the white background, I stamped the Vintage Pattern Mini 2 with VersaMark and embossed with Diamonds and Pearls embossing powder.  The ornament itself was heat embossed with Kaleidoscope embossing powder, and I love how it reflects so many different colors! 

The holly leaves and bow are also from the Circle Ornaments Die set.  I cut the holly leaves from brushed gold paper, and for the bow, after cutting the out of black card stock with the die, I used my VersaMark pen to brush the embossing medium on to the whole bow, then I embossed it with Kaleidoscope powder.  The ornament hanger (also from the circle ornament die set) was cut from gold paper and then embossed with Kaleidoscope powder.  It's amazing how different the same embossing powder can look depending on the color of the paper you use it on!

For the sentiment panel, after stamping the sentiment (from the Vintage Ornament set) on ivory card stock, I used my VersaMark pen to ink around the edges of the Grommet die cut, and embossed with Diamonds and Pearls embossing powder.  Two little black gems were added to the tag.  

This is another easily mailed card... pretty flat but still sparkly and elegant.  


Here are the ODBD products I used today:


Be sure to check out the ODBD Blog to see much more, and please stop by my DT Sisters for more inspiration! 

 Julie * Angie * Dawn * Chris * Cathy * Sabrina * Sandee * Lori

 Thanks so much for stopping by!  I love knowing you were here!  

Blessings,

Wednesday, November 20, 2013

An Elegant Merry Christmas Wish!


Hello friends!  I have another Christmas card done and ready to go!  Yay!  I hope you are all getting yours ready as well, because that season is almost here!!!
 
  I had fun with this one! I used ODBD's Vintage Pattern Mini 1 and 2, stamping both on ivory card and embossing with pearl ep. I cut the bottom with the ODBD Antique Labels and Border die. I also took a piece of brushed gold and just embossed the border on the bottom. For my ornament, I stamped the ODBD Vintage Ornament and heat embossed with gold ep, cut with the ODBD Custom Circles Ornament die, then I matted it with a brushed gold mat. I heat embossed the single poinsettia flower from the Poinsettia Wreath set on to water color paper, water colored it and cut it with the Poinsettia Wreath Die. I also cut 2 pine boughs from brushed gold using the ODBD Fancy Foliage Die. I popped the ornament up on foam dimensionals, and added the sentiment from the Poinsettia Wreath set and die cut that with the Recipe Card and Tags die. I simply added some ribbon and pearls for an elegant card that looks much more complicated than it really is. :)


I am entering this in this week's "Holiday" Challenge at the Shining the Light Challenge on ODBD,  Crafty Creations -  American Thanksgiving/Christmas, Divas by Design - Pretty, Paper Shelter Challenge - Christmas, Sisterhood of Crafters  -  Embossing, Stampavie and More - Christmas,  WordArt Wednesdays -  scriptural word art freebie offered each week - Anything goes

Thanks so much for stopping by!  I love hearing from you!  It really encourages me to keep trying to create inspiring samples!   Blessings to you!


Thursday, November 14, 2013

A Center Easel Card and Basic Tutorial!


 Hello friends!  Today I have something fun to share with you!  I have never made one of these center easel cards before, but I have seen a couple on Pinterest, and decided to give it a try.  I love how it came out!

I could not find a tutorial for this fold, so I tried to describe below how I created this one.  I was not thinking of a "tutorial" when I created it, so I did not take photos along the way until near to the end.  So,  instead, I   drew a diagram and I hope that helps explain the process. 

 I started out with a 5 x 7" base of craft card stock. 

 Then I cut a piece of white card stock 9 1/2 x 6 3/4" and scored it to fold it in half (at 4 3/4").  On one half of the center fold, I cut to the center fold line at 1 7/16" in from each side.  On the center panel between those two cuts, I scored across the panel at the half way point.  This forms the easel to which I will adhere the center panel of my card.

Here is the diagram of the fold and cut lines.  Sorry the lighting is not the best, but I think you can get the idea.


After the two side panels of the white layer are adhered down on the bottom white half of the card, and the center panel is folded in half, you adhere the solid half (the 6 3/4" x 4 3/4" white panel to your 5 x 7 Craft base.


The following is what you will have after adhereing the two side panels of white card stock down on to the bottom, and adhering the white layer to your 5 x 7 base.  (I had decorated my side panels when I took this photo, but it gives you the idea what you should have after following the above directions.)


As you can see, your folded center panel is now going to form the easel that will hold up your main panel.  

Next you cut a main panel to adhere to that folded center part to create your pop up image. I used Craft card stock and  cut my panel a little bigger than the "easel" fold it's adhered to, but just enough to come to the edges of my base.  So my center panel measures 5" H x 3 7/8" W.  Yours could be the exact size as the center panel if you prefer. Decorate your main panel and the side panels however you wish.  I will give the details on how I decorated mine below.  Just one more step to assembling your card first:

To adhere your main center panel to the easel, I find it easiest to apply adhesive to the lower half of the folded white panel  (see photo above), and lining up the lower edge of your decorated panel where you want it, adhere.  You will then have the easel, which is only adhered to the bottom half of the main panel, which allows you to fold the card flat for mailing. See below how it looks from the side once adhered.  It's also a good idea to put either pearls, flowers or some other decoration on the lower edge of your base to form a "stop" for your main panel to rest against when it is open.  As you can see, I used a Spellbinders tag die cut and a stamped sentiment, which is all that's needed to hold the easel up, but not bulky when you want to fold it flat for mailing.


 Here are the products I used to decorate this:

Spellbinders Fancy Tags
Other:  Craft, White and Real Red card stock, Real Red and Gumball Green Ink, Copics, AnnaGriffith Cuttlebug  embossing folder, Red pearls(Michaels), Red Ribbon (May Arts), Dimensionals.

I stamped the holly pattern with Gumball Green, matted with red and adhered to the two side panels.  I die cut the Quatrefoil Pattern from white, cut a craft panel the same size to back it with, and adhered them together, and then adhered the bottom half to the front fold of the center folded panel.  I stamped the Poinsettia Wreath with Gumball Green and then lightly colored with Copic G40.  I colored the poinsettias with Copics R24, R29, Y15), cutting one extra with the Poinsettia die cut so I could pop up the center flower.  I cut the green panel, embossed with the Anna Griffith folder and adhered to the bottom of my center panel, and added the pearls. I added a bow to the wreath, and die cut some holly leaves and berries from the Circle Ornament Die set I stamped the sentiment from Christmas Blessings with Real Red on white, and cut with a SB Fancy Tag. I hand cut along the embossed line so only the white inner part would be used.  I then cut another fancy tag from craft and mounted the white panel to it, and popped that up with 2mm dimensionals.  This gives a stopping point for the easel to rest against when open.  When it's ready to be mailed, it folds down flat.


Thanks so much for stopping by today!  I hope you enjoyed my project and will give this a try!  You could use any dimensions you wanted!  You don't need to use the same size I did... just play with it and I think you'll love the result!  It's a fold that gives a little wow factor, displays beautifully, but is actually VERY easy to do and is very mailable!

Blessings,


Tuesday, November 12, 2013

Clean and Simple but still Elegant!


Hello blogging friends!

Today I'm sharing something different for me, but I do like the way this came out!  I wondered if I'd like this newly released ODBD Poinsettia Wreath embossed in gold on black, so I gave it a try!  I then cut it out with the Custom Poinsettia Wreath Die, and when I put it on this ivory base, I loved it!  So from there I decided to create ivory poinsettias, so I stamped three of the single poinsettias and the bow in the set on water color paper with Versamark, and embossed in gold, and cut out with the custom die.  Then I lightly water colored with markers to give just a hint of color, and I added them to the wreath with dimensionals.  The base is black and there is a brushed gold mat.  The sentiment from the newly released Christmas Pattern Ornament set is embossed in gold directly on the card stock.  So quick.... so easy.... but I think very elegant as well.  I will add a white layer inside for my message, but this one is an easy one to make in mass.  Guess I better get busy!!!


I am entering this in the following challenges:


Thanks so much for stopping by!  I do love knowing you were here!!!