Monday, December 12, 2016

A Pennant-ful Package


Hello friends!  I hope you are all doing well!

Today I'm sharing a Christmas package I'm sending in the mail shortly, and how I decorated it.  I used plain craft colored wrapping paper, and simple twine which I wrapped around the package twice.  Then I cut a bunch of pennants from the new ODBD Dec. release, as well as a few stars from a past release.  I adhered them all with foam tape for a popped up effect.  The sentiment in the middle is stamped with Real Red ink and I cut the pennant die so that the top did not go through the cutting machine, and then I reversed a die on a fold line so I could have a folded tag and my greeting is written inside that tag.  The green star is stamped with Gumball Green ink.


While I might not do this for just any package... for a special one I think it says "I love you enough to do this"!  Yes, it does take a little time but I think the result is worth it.  Hope you enjoyed it as well!

Blessings to you.


Monday, December 5, 2016

Handle With Prayer


Hello friends!  Today I'm sharing a new fold that I'll call a side easel.  I first saw a picture of one like this on Pinterest but there were no instructions with it and so I set out to figure it out.  I did not take photos as I was making this but if there is interest enough, I can try to do a tutorial after the first of the year. It was very simple, especially if you have made a regular easel card before.  Basically all you do is create your easel the size you want it, and cut away the top half of a folded card to leave only a top fold over piece the size and location that you want your easel to be.  Fold that piece in half (so the top folds downward when open) and then cut a top panel to adhere to this folded piece.  Voila!  A side easel! (The image below should help you visualize a top fold card with everything cut away except the easel base itself).   If you have not made an easel card before there are tons of tutorials on line that you can search for on Google and then I think you'll understand my description.  As I said... if there is enough interest in this, I will try to do a tutorial after the first of the year when I have more time to put it together.

The ODBD products I used today are the newly released Handle With Prayer stamp set, the matching Praying Hands Die, the new Praying Border Die, the new Deco Border Die, and the Fillagree Frames Dies and Blushing Rose Paper Collection


The card is embellished only with a few half pearls.  The image is colored with Copics and cut with the matching Praying Hands Die.  It folds flat and is very mailable!  We like that!!! :)

Thank you so much for stopping by today!  I love knowing you were here, and I hope you are enjoying this special time of the year when we celebrate our Savior's birth! 

Hugs,

Thursday, December 1, 2016

Welcome to the December ODBD release!

 Hello friends!  Welcome to the ODBD December release!  I don't know where the time has gone but here we are... it's almost Christmas!  I hope you all are well along on your Christmas cards by now, and if so, this month's release will be a welcome change!  As always, there will be prizes!

Three randomly selected winners will each receive a $25 Gift Code to the ODBD Website  just for commenting on the Design Team cards!  You have until December 2, 2016 at 9:00 p.m. EST to leave your comments on the Designers Blogs for a chance to win!  The Winners will be posted on the ODBD Blog on December 3rd, so be sure to check back there to see if you won!
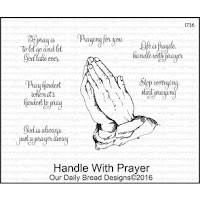
My first card today is a Book Fold card from the Fancy Folds Card Kits at ODBD.  I used the following  products on my "Praying" card : 


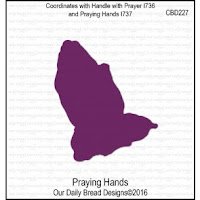
I stamped the sentiment with blue ink on white card stock.  I cut the sentiment panel with a Pierced Squares die, and added a Deco Border die to the top and bottom.  After adhering my design paper to the inside of the card, I adhered the sentiment panel to the left side of the book fold.  I stamped the praying hands with the same ink and die cut with the matching Praying Hands Die, and adhered that to the right side.  I used Bitty Borders to trim the book fold.  Below is the front of the card.  I used the same paper pack to die cut the new Praying Border die, which I love!  I made a white frame by cutting a Pierced Square and inside of that a Square die, then I adhered a Deco Border die to the top and bottom of the frame on the inside.  I adhered the Praying die to the outside.  To give the word die some strength, I die cut it from white card stock and adhered the design paper cut to that.  I popped up the frame onto a square of white card stock that I had embossed with a Sizzix folder.  I added Bitty borders to the top and bottom of the card and tiny blue half pearls.


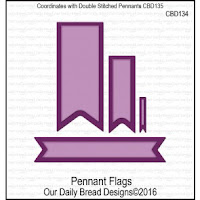
For the card below, I had some fun with the bright bold papers in the Birthday Brights Paper Pad.  I die cut numerous banners from this paper using the new Pennant Flags Die set and the Double Stitched Pennant Flags set.  I stamped the sentiment from the new Pennant Flag Verses set with Baja Blue ink and adhered all of the flags with dimensional foam tape.  I used Bakers twine and tiny buttons and a Cuttlebug embossing folder and a Double Stitched Rectangle die to cut the embossed panel. 


To recap, here are the new products I used today:

http://ourdailybreaddesigns.com/handle-with-prayer.html

http://ourdailybreaddesigns.com/deco-border-die.html

http://ourdailybreaddesigns.com/praying-border-die.html

http://ourdailybreaddesigns.com/praying-hands-die.html

http://ourdailybreaddesigns.com/pennant-flags-dies.html

http://ourdailybreaddesigns.com/double-stitched-pennant-flags-dies.html
http://ourdailybreaddesigns.com/pennant-flag-verses-clear-stamps.html
 Thank you so much for stopping by!  If you have not had a chance to see the entire release, you can do that HERE .

Please visit my DT sisters for more inspiration:

Cathy * Grace * Kathy * Robin * Lisa * Dawn * Sandee * Angie * Julie 
Sabrina * Chris * Diana * Lori * Anita * Helen