Showing posts with label Tutorial. Show all posts

Saturday, June 28, 2014

Cascading Z Fold Tutorial and a sneak peek!

ODBD Stamps: Pennant Row Banner, To The Lovebirds, Designed by Grace Nywening

Hello my friends! I hope you are all doing well!  Thank you so much to those of you who prayed for my granddaughter!  It took several days, but she is now feeling fine again. Praise the Lord!  We had a great time together at our house for 10 days, and now I am at her house, helping her Mom and Dad pack to move July 2!  Never a dull moment, right?  LOL!  It's all good!!!

I also wanted to thank everyone who took my survey!  The results, while pretty much as I expected, did give me a few ideas of things to work on.  One request was for video tutorials, and I don't have a video camera so I can't really do anything about that right now.  Two others were for more no brainer cards.  I have been trying to do that lately... simplifying and making cards that are easier to mail... however I will continue to try to add more in.  If you've followed me for long... you know my style.  It's not so loaded up with stuff that you can't find the stamps... but it's also not clean and simple.  LOL!  I'd say simply elegant is my comfort zone, but I have been trying to do more CAS designs so I will strive to add more of those in to the mix!  It seems split down the middle whether you prefer full posts in the email or links to my blog so that was interesting!  The reason I like you to come to the blog is because while here you might see something else that interests you, or links to others who also might inspire you.... and of course... we ALL love comments that let us know you were here!  It can take a lot of time to write posts, especially with tutorials, and it's just nice to hear from you in the form of a comment.  I plan to leave it at the full post for now and we'll see how that goes.  The other request was for a few more tutorials.  With that said... today I have a mini tutorial for you... just a simple diagram I drew to show you how to make the fold for this card.  I hope you enjoy it!

Today's card is also  a sneak peek for you at some  fun new sets coming to you from  Our Daily Bread designs July 1!  I prepared a little tutorial sheet for you to see how to make this easy card, which I'm calling a Cascading Z Fold card.  I adapted the measurements to work best with the sizes of these awesome new banners being released July 1.

First.... a few details about what I used.  As you no doubt have noticed, pennants are all the rage right now... so keeping right on trend, ODBD has an awesome release of versatile and fun pennants coming your way!

I used a soon to release set called Pennant Row Banner, and an ODBD Custom Pennant Row Die set to create my banners.  I also used  past releases, To The Love Birds, ODBD Custom Bird Cage and Banners Die, ODBD Custom Fancy Foliage Dies, and the gorgeous designer paper from the Blushing Rose Paper Collection

Here is a chart I drew up to show you how to cut your paper, and where to score and fold.


Cut 12" card stock to 5 1/2"
Score at 4" and 8"
Mark a point on left side at 1 13/16" high
Draw line from top right corner of middle panel to this point abd cut
Fold on scored lines
How easy is that?!!!

So I used 12" Bazzill for my base, and decorated each panel with the ODBD Blushing Rose Paper Collection, sponging with distress ink on all layers.  I stamped the birdcage image from To The Love Birds with VersaMark on Acetate, and heat embossed with Medieval Metal embossing powder.  I used the Custom Bird Cage Die to cut it out.  I adhered that on the designer paper just offset a bit from the matching image on the designer paper itself to give depth and added interest without covering up the gorgeous paper.  I also embossed three birds the same way and cut them out with the custom dies, setting aside until my card was ready to be decorated.  I then cut three scalloped pennant rows from my Bazzill card stock as mats, and I stamped three of the different words from the Pennant Row Banner set with Blushing Bride ink, and cut them out with the custom dies.  I adhered them to the mats, and for the middle banner that says "inspire" I took little tucks between each letter to slightly shorten the total span of the row.  I decorated with pearls, the embossed birds I had cut out, a little May Arts lacey ribbon,  and a silk rose I air brushed with a pink marker to match the pinks in the paper, as well as some pretty flourishes from the ODBD Fancy Foliage Die set. 

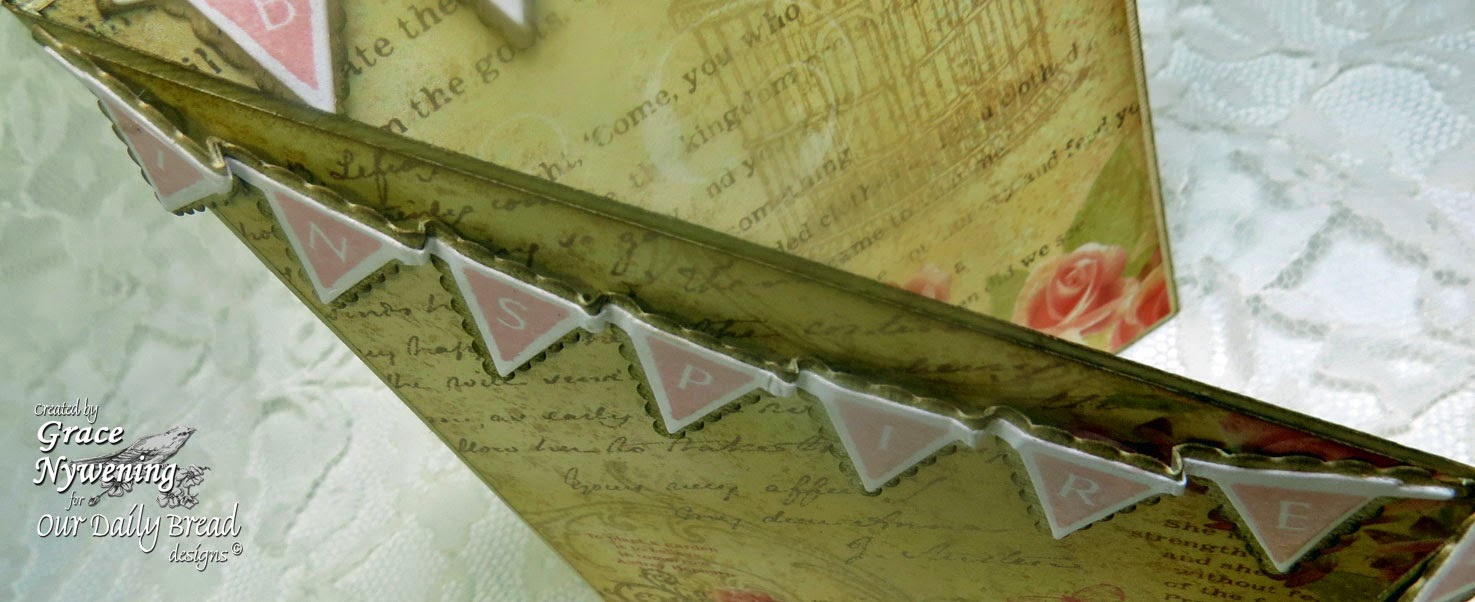
Here is a photo of the little tucks I took for the middle banner to be sure it would fit within the folds on both sides of the card, without affecting the flags themselves.  I added the pearls to cover, but as you can see in this picture, you really don't need to.  I think the tucks look pretty cool and give some extra dimension to the banner.  In the photo below, don't confuse the scalloped ridges with the tucks.  The tucks are just in between each flag... the rest of the dimension you see is just the scalloped pennant row behind the lettered one.

ODBD Stamps: Pennant Row Banner, To The Lovebirds, Designed by Grace Nywening


 I shortened one banner word from "Blessed" to "Bless". You might ask me why did I do that?  Well...I wanted it to be a verb... an action word like the other two.  As I was making the card, I perceived it as being read from the front to the back, or in this case from the bottom to the top... so I was thinking... this is what we as card makers do! We believe in something... we inspire others as we create, and we bless others as we give.   Taking that idea even further...as Christians.... our faith often is the motivator behind our cards.  So I started with believe!  Personally, my belief in Jesus Christ as my Savior and only way to be redeemed to a Holy God IS my belief and my reason for doing what I do.  I then want to move on to the next step in my journey... to inspire others... whether that be creatively or spiritually or in some other way!  Finally... it's my prayer that my cards bless the recipients and even those of you who so faithfully stop by to view them here on my blog.

Here's a few more views:

ODBD Stamps: Pennant Row Banner, To The Lovebirds, Designed by Grace Nywening


ODBD Stamps: Pennant Row Banner, To The Lovebirds, Designed by Grace Nywening
And closed... it folds totally flat unless you have 3-D flowers or embellishments that are thicker.

ODBD Stamps: Pennant Row Banner, To The Lovebirds, Designed by Grace Nywening

I hope you enjoyed this little tutorial for a different fold that in my opinion is just MADE for rows of pennants!  :)
I so welcome and appreciate your comments!  They mean more to me and bless me more than you know!

I hope to see you back on July 1 for the release!

Blessings,

Friday, May 9, 2014

An Angel Ornament Tutorial!

Our Daily Bread Designs Angel Wings Die set, ODBD Beautiful Border dies, designed by Grace Nywening

Hello my friends!  Today I have a fun little tutorial for you on how to make this sweet little angel ornament!  I hope you'll give it a try and have as much fun with it as  I did!  I'd love to see what you come up with!  You can email me a picture at my email me link in the left side bar if you don't have a link to a gallery or blog to share with me.

Here are the MATERIALS you will need.

Our Daily Bread Designs Custom Angel Wings Die Set
ODBD Custom Beautiful Borders Dies
Spellbinders Grand Scalloped Circle Die (or trace a plate about 61/4" wide and hand cut)
Cheery Lynn French Pastry Doily Die
Platinum or Silver card stock (I used Martha Stewart)
White Card Stock (I used Georgia Pacific)
White Copy Paper
White Paper Doily 6" wide
Crystal or silver bead - mine is about 7/8" high, and 2 silver bead caps (I used 2 sizes, but both could be the same)
Silver cord, silver wire
Crystal Bling (Recollections used here)
Hot Glue Gun
Adhesive Tape or runner
Tombow Mono Metal Glue (available at most major craft stores)
Clothespins or paper clips to clamp while drying
Frosted Lace Stickles


 DIRECTIONS:

1. Cut platinum or silver card stock with Spellbinders Grand Circle or Scalloped Circle Die. (If you don't have the Grand Circles, find a plate about 6.25" wide and trace around it and hand cut the circle.  This layer really does not show much, just a little silver shows through your doily, but it gives rigidity to the ornament.  The ones that are just made out of doilies seem to smoosh very easily.  Also note... the exact measurement is not critical.  If you have something a little smaller or a little larger, it won't make a big difference.

2. Find the center of your circle (I measured and drew lines on the back side to find the center).  Cut one fourth of the card stock away.  Add adhesive to one edge as shown.


3.  Adhere the adhesive end over the other end, forming a cone and matching scallops if you used the scalloped die.  I used adhesive strip, but I also added a thin line of TombowMono Metal glue right to the edge so there was o curing up.  I used clothespins to hold until it was dry.


4.Do the same with the 6" Doily.  You want to make the cone over top of the base cone so you know it fits nicely on top.(Again, size is not critical as long as it will fit over the base you created).  You can cut off any extra overlap if desired, or simply match patterns and overlap any extra.  I cut off my extra, leaving just enough for good adhesion in an overlap.


5. Place a dot of adhesive on the back of doily inside cone, to hold it to the base cone, but not much is needed as we will hold it together with the bead at the top later.

6.  Cut 1 Cheery Lynn French Doily from copy paper, and cut in half.


7.  Make 2 small cones for sleeves and adhere to the sides of your angel.  I used Tombow Mono Metal glue because it dries fast and holds very well.  Use clothespins or other clamps to hold in place until glue is set.  Sorry I missed getting a photo at this step but you can see in the below photos where the sleeves go.

8.  Pass a 4" piece of thin silver wire through large crystal bead, twisting it under the bead and down to the end. Add a silver bead cap (I used my smaller size here, with the curve facing up as shown below.   Cut 8.5-9" piece of silver cord and pass through one of the bead caps in the orientation shown below. (I used the larger one here).


9. Pass the silver cord with the silver bead cap down through the hole in the top of the cone. If the hole at the top of your cone needs to be a bit bigger, snip off just a tad so you can pass the cord through.  You don't need much room so start small and if you need more you can always take more, but try to keep the hole as small as possible while still allowing you to bring the cord trough.


 10.   Pass Crystal bead with wire and small cap down through the center of the other larger bead cap, spreading the silver cord so it comes out to the sides (one on each side) of the crystal bead.


11. Tie a knot in the silver cord near the end on the inside of the cone.


12.  While holding the cord in the position you want it to come out (on each side of the crystal bead head), add a good blob of hot glue right up in the top inside of the cone.  While it's still soft, position cords and bead as desired.  The hot glue when dry does a good job of holding this position if you have enough to completely surround the wire and cord.


13.  Cut 2 Angel Wings and one Beautiful Border with the ODBD dies, from white card stock.  Cut off just 2 sections of the beautiful border, and save the rest for a card or different project.


14.  Adhere one piece of the border at neckline in front, and one at back.  Adhere wings to back of angel and sleeves as shown below, using the Tombow Metal glue.  Now you can decorate as desired.  I used Recollections crystal bling and put one flourish on the back, and one on the front.  I added Stickles to the wings for some sparkle.


That's it!  You have a pretty ornament that's a lot sturdier than most paper doily angels, and is truly beautiful!  I hope you have fun with it!!!  These would be cute as Christmas tree ornaments, but could also be fun without the hanger cord, as favors on your table, perhaps with a little bag of goodies tucked up inside.  I could also see them as great little gifts for someone going through a difficult time who needs a reminder that God has given His angels charge over us, to keep us in all our ways.  There are lots of possiblities and you can pop these out very quickly once you get your "groove" going! :)

This brings to mind a Psalm that reassures us of God's protection and watch care over us, if we know Him and place our total trust in Him.  It blesses my heart every time I read it.

Ps. 91

1 He that dwelleth in the secret place of the most High shall abide under the shadow of the Almighty.
I will say of the Lord, He is my refuge and my fortress: my God; in him will I trust.
Surely he shall deliver thee from the snare of the fowler, and from the noisome pestilence.
He shall cover thee with his feathers, and under his wings shalt thou trust: his truth shall be thy shield and buckler.
Thou shalt not be afraid for the terror by night; nor for the arrow that flieth by day;
Nor for the pestilence that walketh in darkness; nor for the destruction that wasteth at noonday.
A thousand shall fall at thy side, and ten thousand at thy right hand; but it shall not come nigh thee.
Only with thine eyes shalt thou behold and see the reward of the wicked.
9 Because thou hast made the Lord, which is my refuge, even the most High, thy habitation;
10 There shall no evil befall thee, neither shall any plague come nigh thy dwelling.
11 For he shall give his angels charge over thee, to keep thee in all thy ways.
12 They shall bear thee up in their hands, lest thou dash thy foot against a stone.
13 Thou shalt tread upon the lion and adder: the young lion and the dragon shalt thou trample under feet.
14 Because he hath set his love upon me, therefore will I deliver him: I will set him on high, because he hath known my name.
15 He shall call upon me, and I will answer him: I will be with him in trouble; I will deliver him, and honour him.
16 With long life will I satisfy him, and shew him my salvation.

I have entered this in this week's Shining the Light Challenge, which is "Wing it".  You still have a couple days to play along and possibly win a prize!


Thanks so much for stopping by!  I hope you enjoyed this little project and were blessed as well!

Hugs,

Thursday, November 14, 2013

A Center Easel Card and Basic Tutorial!


 Hello friends!  Today I have something fun to share with you!  I have never made one of these center easel cards before, but I have seen a couple on Pinterest, and decided to give it a try.  I love how it came out!

I could not find a tutorial for this fold, so I tried to describe below how I created this one.  I was not thinking of a "tutorial" when I created it, so I did not take photos along the way until near to the end.  So,  instead, I   drew a diagram and I hope that helps explain the process. 

 I started out with a 5 x 7" base of craft card stock. 

 Then I cut a piece of white card stock 9 1/2 x 6 3/4" and scored it to fold it in half (at 4 3/4").  On one half of the center fold, I cut to the center fold line at 1 7/16" in from each side.  On the center panel between those two cuts, I scored across the panel at the half way point.  This forms the easel to which I will adhere the center panel of my card.

Here is the diagram of the fold and cut lines.  Sorry the lighting is not the best, but I think you can get the idea.


After the two side panels of the white layer are adhered down on the bottom white half of the card, and the center panel is folded in half, you adhere the solid half (the 6 3/4" x 4 3/4" white panel to your 5 x 7 Craft base.


The following is what you will have after adhereing the two side panels of white card stock down on to the bottom, and adhering the white layer to your 5 x 7 base.  (I had decorated my side panels when I took this photo, but it gives you the idea what you should have after following the above directions.)


As you can see, your folded center panel is now going to form the easel that will hold up your main panel.  

Next you cut a main panel to adhere to that folded center part to create your pop up image. I used Craft card stock and  cut my panel a little bigger than the "easel" fold it's adhered to, but just enough to come to the edges of my base.  So my center panel measures 5" H x 3 7/8" W.  Yours could be the exact size as the center panel if you prefer. Decorate your main panel and the side panels however you wish.  I will give the details on how I decorated mine below.  Just one more step to assembling your card first:

To adhere your main center panel to the easel, I find it easiest to apply adhesive to the lower half of the folded white panel  (see photo above), and lining up the lower edge of your decorated panel where you want it, adhere.  You will then have the easel, which is only adhered to the bottom half of the main panel, which allows you to fold the card flat for mailing. See below how it looks from the side once adhered.  It's also a good idea to put either pearls, flowers or some other decoration on the lower edge of your base to form a "stop" for your main panel to rest against when it is open.  As you can see, I used a Spellbinders tag die cut and a stamped sentiment, which is all that's needed to hold the easel up, but not bulky when you want to fold it flat for mailing.


 Here are the products I used to decorate this:

Spellbinders Fancy Tags
Other:  Craft, White and Real Red card stock, Real Red and Gumball Green Ink, Copics, AnnaGriffith Cuttlebug  embossing folder, Red pearls(Michaels), Red Ribbon (May Arts), Dimensionals.

I stamped the holly pattern with Gumball Green, matted with red and adhered to the two side panels.  I die cut the Quatrefoil Pattern from white, cut a craft panel the same size to back it with, and adhered them together, and then adhered the bottom half to the front fold of the center folded panel.  I stamped the Poinsettia Wreath with Gumball Green and then lightly colored with Copic G40.  I colored the poinsettias with Copics R24, R29, Y15), cutting one extra with the Poinsettia die cut so I could pop up the center flower.  I cut the green panel, embossed with the Anna Griffith folder and adhered to the bottom of my center panel, and added the pearls. I added a bow to the wreath, and die cut some holly leaves and berries from the Circle Ornament Die set I stamped the sentiment from Christmas Blessings with Real Red on white, and cut with a SB Fancy Tag. I hand cut along the embossed line so only the white inner part would be used.  I then cut another fancy tag from craft and mounted the white panel to it, and popped that up with 2mm dimensionals.  This gives a stopping point for the easel to rest against when open.  When it's ready to be mailed, it folds down flat.


Thanks so much for stopping by today!  I hope you enjoyed my project and will give this a try!  You could use any dimensions you wanted!  You don't need to use the same size I did... just play with it and I think you'll love the result!  It's a fold that gives a little wow factor, displays beautifully, but is actually VERY easy to do and is very mailable!

Blessings,


Thursday, March 7, 2013

A Shabby Chic Project and Tutorial

Hello friends!  Today I created a little tutorial over on the ODBD Blog on how I created this wood framed art piece. I used several of this month's release  as well as several older sets, including Recipe Card Lines Happy Marriage Recipe, Kind Hearts, Sentiments Collection, Sweet William Small, Love, Sewn with LoveI also used this month's ODBD Custom Recipe  & Tags Die, ODBD Custom Apron, &Tools DieThe focal point   is an accordian style file with recipe cards insdie, and I give the full tutorial on that, as well as the basic steps used to create this entire piece.  I hope you'll come over and have a look!

Here are a few close ups:


Thanks so much for stopping by... and I hope you'll come see my tutorial HERE!

Thursday, November 29, 2012

A Snowy Sneak Peek and a mini tutorial!


Hello my friends!  Today I'm excited to give you a sneak peek at a couple sets coming your way on Dec 1 from Our Daily Bread designs!  I created this luminary ornament using the Small Snowflake Background and the Sparkling Snowflakes set.  I thought I'd share a mini tutorial on how to create these cute little ornaments.... which are perfect with battery operated tea lights in them, but could also be filled with all sorts of goodies if preferred!

So here is what you will need:

Our Daily Bread designs Small Snowflake Background Stamp and Sparkling Snowflakes set (coming Dec 1)
Our Daily Bread designs custom Tag Die
Score Pal or Score Buddy or the like
Blue card stock of choice
Ranger Perfect Medium, Stampendous Kaleidoscope Embossing Powder, Ranger White Embossing Powder
Spellbinders Mega Ovals (#2 die)
Vellum
Ribbon of choice
Tombow Metal glue or other strong quick drying glue

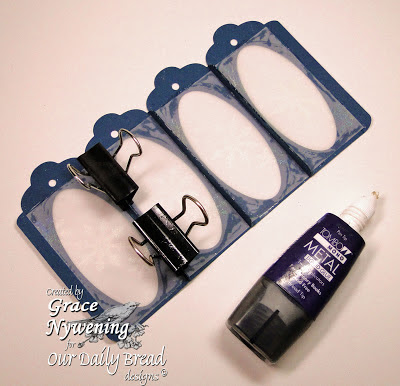
To begin  you will cut four tags out of blue card stock, and stamp them with Perfect Medium and heat emboss with white embossing powder.  Then center the #2 die from the mega oval die set, and cut the oval window out of each panel.


  Score each tag 1/4" in on each side and burnish each fold.

Cut a square from the blue card stock 2 1/4" square for the bottom. (If you want to wait until your ornament is together so you can measure it exactly, that's fine.  These were my measurements, but you could always come up with just a slightly different measurement on yours, so if your bottome piece doesn't fit, that would be my
 recommendation)

Score the bottom square in 1/4" on each side, fold and snip into 1 side of each corner to the fold.


Cut 4 pieces of vellum to fit inside ornament (mine was 1 9/16"w X3 3/8" high).  Stamp with an arrangement of three of the smallest stamps in the Sparkling Snowflakes set using Perfect Medium, then heat emboss with Stampendous Kaleidoscope embossing powder.


Now you will glue each 1/4" seam together using Tombow glue.  (I clamped with paper clips for a couple minutes until set.)  Next, run a thin bead of glue around each oval window, and insert the vellum, pressing down smoothly. Let dry for a couple minutes.

From here, you will glue your last seam to complete the square, and then after gluing the bottom  corners, you cut, just slide that square up onto the four sides and glue.

Decorate as desired.  I chose to just use 2 holes this time and added ribbon as a hanger with a knot on the inside of the luminary.  You could also use all four holes and hang thin cord from each hole.  It's all up to you! Insert battery operated tea light and enjoy!

That's it!  Easy peasy and yet looks very pretty on the tree!  I hope you'll give it a try... and don't forget to be back here on Dec 1 for a HUGE and fabulous release!!!!  See you then!!!

I am entering this in the following challenges:   4 Crafty Chicks -  Ornaments, Charisma Cardz - 3E, C10 - #47 Christmas with a twist, No Green, Gold or Red, Crimbo Crackers - , must be Christmas - #29   Anything holiday/festive  Cute Card Thursday -  Snowflakes, Little Miss Muffet Challenges -  ) Tags or Gifts (made with tags, and as a gift), Pixie Dust Studio - Winter Holiday Creations, Sassy Studio Designs - SIO - #153 Christmas Anything BUT a Card and Our Daily Bread designs - Deck the Halls (ornaments)

Blessings,

Thursday, October 18, 2012

A Christmas Decorative Cone and tutorial link

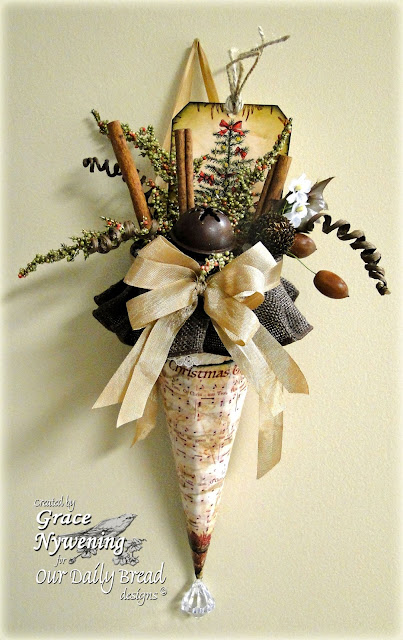
Hello friends!  Today I have a fun Christmas decor item I created for my "Time With" post over on the Our Daily Bread designs blog.  This was super fun and easy, and best of all... it's NOT made of flimsy card stock, but rather a heavy chip board cone that can be used season after season.

I used this month's release of O Christmas Tree Carol Background, Perfect Gift, and Sacred Season for my cone and tag.  I hope you'll stop by the Our Daily Bread designs Blog today to see the full tutorial!

I am entering this in the following challenges:
 ABC Christmas Challenge -  Anything goes, Cards by Lady Anne / Stamp Challenge - must stamp - Anything Goes, Inky Impressions - Anything but a card, Just Keep on Creating -  Christmas, Stamp n Doodle - anything goes,
Anything Goes Challenge - #78 Make your Own Embellishments (see tutorial link for the curly cues and tag), Bearly Mine -  #56 Anything Goes,
Deep Ocean Challenge -  #36 Anything Goes, Elke Kaart Een Feestje  - #137 Make A Christmas Tree Ornament, Flourishes -  #191 Winter Inspired projects, Sweet Stamps - - #87 Stippled or Sponged,
 Through The Craft Room Door - Always Anything Goes!
Thanks so much for stopping by!
Blessings,

Thursday, July 28, 2011

Pop Up Gift Card Holder Tutorial

pop-up-gchldr-front-2

Hello everyone!  Today I am honored to have been asked by Joan Fricker of Joan's Gardens to share a project with you and the tutorial on how to make it.  She is posting this gift card holder this week on her Blog along with a challenge for you to play along!  I will share how to make this fun pop up gift card holder, and then you have two weeks to play along.  It's very easy to make,  and the prize you could win will be well worth the effort! Before I give the details of how to construct this, I want to show you different angles of what you will be making.  I have made my card 5.5" square.  When it's slightly open, the picture below is what you'll see of the pop up element on the inside when it's partly folded up.  It will fold totally flat and mail just fine!

pop-up-side-view

The photos below show the pop up when the card is open.  It holds a gift card perfectly and makes such a pretty presentation!

add-gift-card

Joan's-Garden-pop-up-side-d


So lets get started with the tutorial!

Card Base:
Create a top fold card 5.5" square.
Decide on designer paper you'll decorate the inside and front with. (I used Graphic 45 LeRomantique 8 x 8 Pack).


Pop Up:
Cut card stock 5.5" x 6"
Score and fold according to diagram above. Dotted lines are fold lines.
Fold like photo below:


Now you need to plan your decoration for the inside of the card.  You will want to either stamp on your card stock or adhere designer paper as I did.  You will also need to decorate the panels of the pop up that I have marked with an X in the picture below:


Below is what you will have when you add dp or stamping to these panels of the pop up, and you should add red line tacky tape or other strong adhesive to the inside of each end of the little groove that has been formed. This just keeps it neat and tight.
 

Below is what you have when you adhere those ends together: A nice tight slot to hold the gift card.


Next, you will adhere the pop up to the inside of your card.  Begin by lining up the lower 1 1/2" undecorated part of the pop up with the center fold of the card.  Adhere it just below that center fold of the card as shown below:


Now fold the pop up forward on the bottom of the card the way it will fold when card is closed as shown below:

Apply adhesive to the top of the pop up which will fold down and adhere to the back of the card.  Be sure to run enough adhesive to cover the panel. In case the picture is confusing... the top of the card below is on top, and the white where I'm adhering adhesive is the white panel you see above.... it's the back part of the pop up that will adhere to the back of the card.


Now, simply close the card down with the pop up in place, and press to adhere.

Now when you open the card, your pop up will do just that!  It will pop up!


I have tried to make this easy with step by step instructions but don't let the number of steps scare you... this is so easy and when you get into  it, you will totally understand it and be thrilled at how easy it is to create a gift card with such great impact!

Now you just need to decorate the front of your card, and add any message you want to add to the inside.

I added a sentiment inside using Heartfelt Creations HCPC3348 Cardinal Pinecone Border PreCut set, and Spellbinder's Fancy Tags Two.

My card front uses one large classic rose and three small classic roses from the Heartfelt Creation Bella Rose Collection HCPC3394, one Bella Rose Leaves Precut set HCPC3390, and the Bella Rose HCD17 Custom dies to cut them.  I colored them with Copics and used a piercing tool to curl my petals and leaves quite a bit, breaking down the fibers enough to give good dimension without tearing the paper.  I cut a Cheery Lynn Canadian Kaleidoscope Doily Die to cut the doily out of vintage cream card stock, and a Martha Stewart Double Loops Around the Page Punch set for my matting.  A shabby seam binding bow was my only embellishment because all the stamped images and lovely doily needed to take center stage.  Most all the products I used are available at Joan's Gardens

I also want to add that Cheery Lynn is having a Design Team Call and I love their dies, so I think it would be a great team to be on!  Check it out here!

I do hope you'll give this easy gift card holder a try!  I can't wait to see what you come up with!

Thanks so much for stopping by and have fun with it!!!