Thursday, October 29, 2015

Guide us to they perfect light!

ODBD stamps: Perfect Light, dies: Christmas Candles, Merry Mosaics, Peaceful Poinsettias, Mini Tags, Fancy Foliage; Designed by Grace Nywening

 Hello friends!  I hope you are all doing well!  I apologize this post did not go up as the set time and I was not home to check it yesterday.  I have been diagnosed with breast cancer and have been running constantly it seems to Drs. to get a treatment plan together.  I would truly appreciate your prayers in the months ahead!!! 

With that said, here is my post a day late for the look back post.


Today we are taking a look back at Our Daily Bread Designs Oct. Mid Release. 

I created this card using the new sentiment set, Perfect Light, as well as the most awesome new dies: Christmas Candles  and Merry Mosaics.  

I started with a cranberry base.  On that I layered brushed gold paper, followed by a patterned paper from the ODBD Christmas Card Collection 2015.  I used the Layered Lacey Squares dies to cut my main image panel from some marbled yellow card stock from my stash.  I embossed it in the die and sponged the edges with Cherry Cobbler ink.  I die cut the awesome Christmas Candles from brushed gold, removing all the inside parts and using just the outline.  I adhered this to my yellow panel, and matted this panel with more cranberry and brushed gold.  To embellish I cut two Peaceful Poinsettias sizes from different paper, and one brushed gold Merry Mosaics for each of the three flowers.  I used the pale yellow, sponged with cranberry, some scraps from the Christmas Paper Collection 2015 for the lower layers, and topped with brushed gold.  I added some brushed gold holly leaves from the same set, and a Fancy Foliage die cut from brushed gold.  To make the Fancy Foliage flourish look Christmasy, I used some of the gold holly leaves I had removed from my Candle die and adhered them over the regular leaves that are on the flourish.    I stamped the sentiment on yellow and die cut with one of the Mini Tags Dies. I added a sheer gold ribbon and bow and some pretty cranberry half pearls to finish.  I love the vintage feel to this card and it really went together pretty quickly! 

Here are the NEW products I used on this card:


Thanks so much for stopping by today!  For more inspiration, please visit my DT sisters blogs below:

Julie * Dawn * Amy * Chris * Cathy * Grace * Sandee
Robin T. * Lori * Sabrina * Angie * Diana

Blessings to you,

Friday, October 23, 2015

Ready for Christmas?


Hello friends!   I hope you are all doing well!  I am amazed at how time seems to be just flying by!  If you're a card maker, you are in your super busy time right now as Christmas is just around the corner!  LOL!  I'm sharing a card made with some of the new products released by Our Daily Bread Designs that may help you get that job done faster!  ....And we all know that's a GOOD thing, right?

Today's card is made with a sentiment from the Mid-Oct. release, Perfect Light, as well as the new Windowsill Candles dies.  I used various elements of this die set to decorate my Welcoming Window Die, and I used a piece of a BoHo Background die cut as well as a tiny corner die from the Ornate Borders and Flower Die set.   

I started with a Neenah Solar White 140 lb card stock base and layered on some designer paper from the Christmas Paper Collection 2014.  I used a scrap of a second sheet from that pack for my swirly starry "outside the window" background.  I double cut and layered the window and frame, and popped them up with dimensional tape.  I stamped the sentiment with Baja Breeze ink and cut the panel, then embossed it with a Cuttlebug Embossing folder for a little texture.  I used the "back" or recessed side so my sentiment would still show up well.  I had fun decorating the window and "chair rail" with lots of the little holly leaves, sqirled leaves and pine boughs.  I also used the little bows and berries, to which I added Stickles  for a little sparkle.  A few pearls finished it off.  

Thanks so much for stopping by!

Tuesday, October 20, 2015

All is Calm, All is Bright!


Hello friends!  I hope you are all well!!!

Today I wanted to share a very simple card created with the newly released Peaceful Deer set, from Our Daily Bread Designs.  I heat embossed the image with silver on white card stock.  I split the panel using the ODBD Leafy Edged Border dies, and stamped the sentiment in the lower right corner.  I matted with some Recollections Natural glittery paper, and adhered to a craft base.  I just added some silver thin ribbon to my edges to give a little more sparkle and to define the edges.  I kept this one simple as I think it's perfect for a masculine card just as it is.  I'm sure all of us have single guys we need cards for even at Christmas, and while this one could go for anyone... it definitely would work for a masculine card.

Keeping it short today.  I have a test today, and  prayers would definitely be appreciated!

Blessings to you!

Thursday, October 15, 2015

Welcome to the Mid- October ODBD Release!


Hello everyone!  Welcome to the Mid-October release from Our Daily Bread designs!  I hope you've had the chance to see the entire release, but if not you can view it all HERE

Here are the details on how you can win a prize!

Three randomly selected winners will each receive a $25 gift certificate to the ODBD Store, to be used toward the purchase of ODBD Stamps found in the "ODBD stamps column" of the website just for commenting on the Design Team cards!  You have until October 16, 2015 at 9:00 p.m. EDT to leave your comments on the Designers Blogs for a chance to win!  The Winners will be posted on the ODBD Blog on October 17th, so be sure to check back there to see if you won!

 For my card above, I used the new Peaceful Deer set.  I stamped the image with Memento ink and colored with Copics.  After the image was colored I masked it and used my air brush to do the background.  I then cut that out with the ODBD Custom Layered Lacey Squares Die.  I embellished with some Stickles for snow and my white copic ink to paint white on the branches and the spots on the deer.

To create my card, I started with a blue base and die cut white card stock with the ODBD Custom Leafy Edged Borders, and then I embossed that panel with a Darice Snowflake embossing folder. I spritzed it with Pearl Glimmer Mist for a pretty shimmer.   I cut a strip of the same card stock as the card base with the Leafy Edged Borders to go over top of the white.  I stamped the sentiment in the lower right corner, then placed my white panel over that.  I used foam tape to adhere and pop up the image panel.  Then I cut two sizes of the new Merry Mosaics die cut flowers from white, and two blue flowers cut with a previous release, Peaceful Poinsettias.  I layered these together along with some leaves from the Merry Mosaics set, and some greenery from the Fancy Foliage Dies set. I used the flower center from the Merry Mosaics die set, cut it from blue card stock then added perfect pearls for texture.  

For the card below, I used the new stamp set, Perfect Light.  I stamped it on white card stock and heat embossed in gold.  Then I cut it out with a die from a past release, the Recipe Card and Tags Die set.  I cut and embossed the Sunburst Background Die, then rubbed Brilliance Gold Ink over the raised areas, and heat embossed that with  kaleidoscope embossing powder.  I love this powder as it picks up the shades around it and radiates shimmer and gorgeousness.  I used the new Christmas Candle Die set to cut both my candles and my holly border.  I cut the candles three times: once from gold mirrored paper, once from green mirrored paper, and once from the ODBD Christmas Card Collection 2015.  I pulled out the parts I wanted to paper piece in from the gold die cut, added the green leaves and the swirled candles, and adhered them to the card with foam tape.  To create the border I just cut the leaf part of the die out twice, and trimmed off the unwanted parts.  I lined them up and created the border.  I cut 3 little poinsettias from the set from gold mirrored paper and adhered them.  I used a white base and green mirrored mat for this card and I really do love how this came out.  I hope you like it too!  

I can't read this sentiment without breaking in to song with Point of Grace's rendition.  I felt the sunburst background beautifully depicted the radiating light of our Savior.  

ODBD products: Christmas Candles, Perfect Light stamps, Sunburst Background die, Recipe card and tags die, Christmas Card Collection 2015; Designed by Grace Nywening
Here is a YouTube link in case you would like to hear this beautiful Christmas song:


To recap, here are the new products I used today:


In case you missed my sneak peek this week, here is another card made with this release:


Thanks so much for stopping by!  Please visit my DT sisters linked below to see more inspiration, and to be qualified to win one of the three prizes being given away just for leaving a little love on the DT blogs!

Julie * Dawn * Amy * Chris * Cathy * Grace * Sandee
Robin T. * Lori * Sabrina * Angie * Diana

Blessings as you revel in the Peace and Light of the Savior,

Monday, October 12, 2015

A Sneak Peek at the Mid- Oct. ODBD Release!


Hello friends!  Today I am sharing a quick sneak peek at another new release coming from ODBD!

This card is made using a new sentiment set which I LOVE, Perfect Light.  I also used some awesome new dies: Windowsill Candles, and Merry Mosaics.  The paper is also a new release, Christmas Card Collection 2015.  In addition, I used a couple past releases: Peaceful Poinsettias DiesFancy Foliage Dies, and Vintage Labels Dies.  

I started with a cranberry card stock base, and added the layered sheet from the new paper pack, then I stamped the sentiment from Perfect Light on vanilla card stock with Memento ink and sponged with Brilliance Gold ink.  This new card collection has some pretty awesome pre-layered sheets as well as toppers and tags.   It's a new concept for ODBD and I love it!  The card topper piece actually has a different sentiment on it (which I covered with this one) and it has a cranberry frame, so I let a little show beyond my vintage label.  Anyway... I adhered my sentiment panel on the paper using dimensional foam tape, and then embellished with the Windowsill Candle die cut, which I cut from gold mirrored paper.  I cut three of the Merry Mosaic poinsettia flowers from the same gold mirrored paper, and 3 cranberry Peaceful Poinsettias and layered them together.  They are made to coordinate and do so perfectly whether you overlay them as I did here, or whether you offset them as I have done on other samples.  I added a couple flourishes from the Fancy Foliage Die set and finished off with some red pearls and tiny gold vines die cut from the Windowsill Candle die set, which I adhered to the sentiment panel.  If you look closely you'll also see some pretty little foliage in gold and cranberry tucked in to my floral spray.  That cute little die is also in the Windowsill Candle set.

I hope you'll be back on Oct. 15 to see the full release and lots of awesome inspiration from the DT!

Thanks for stopping by!!!

Blessings,


Monday, October 5, 2015

Glad Tidings!


Hello friends!  I hope this finds you all well! Here in NC we've had a lot of rain this past week, but we're thanking the Lord for it as it was much needed!  My heart goes out to the people who have been flooded out, had trees fall on their homes, etc. 

Today I am popping in quickly to share a card I made using the Oct. new release from ODBD.  This card is made with the new Delightful Decorations stamp set and matching Delightful Decorations Dies I was looking at one of the papers in the Christmas Paper Collection 2015, and loved the floral prints and the various shades of color in the florals, so I tried to mimic that in my ornament, which uses the same floral design.  I heat embossed the ornament in gold and then did a resist technique, sponging on various distress inks to get the multi-colored effect.  After all that, I didn't like it against that particular paper, but I did love it with this sheet of paper from the same Christmas Paper Collection 2015.  So I used that on my ivory and distress sponged base, and then layered on a Layered Lacey Square die cut from brushed gold paper.  I used more ivory, cut and embossed with the same die set, and then popped my ornament up on dimensional tape on that.  I used a pine bough from the ODBD Custom Fancy Foliage die set to give the ornament some place to "hang" and topped it off with a tiny ribbon.  I heat embossed the sentiment from the Delightful Decorations set, and cut it with the ODBD Custom Mini Tag dies.  

One more Christmas card done!  A long ways to go.... but I'm loving getting some done this early!
Blessings,

Thursday, October 1, 2015

Welcome to the ODBD Oct. New Release!

ODBD dies: Adore Him, Leafy Edged Borders, Pennant dies, designed by Grace Nywening
Hello friends!  Welcome to the October New Release from Our Daily Bread Designs!  I hope you've had the chance to view the entire release, but if not, you can see it all HERE.

As always, there are prizes so here are the details you need to know to qualify to win one:

Three randomly selected winners will each receive a $25 gift certificate to the ODBD Store, to be used toward the purchase of ODBD Stamps  just for commenting on the Design Team cards!  You have until October 2, 2015 at 9:00 p.m. EDT to leave your comments on the Designers Blogs for a chance to win!  The Winners will be posted on the ODBD Blog on October 3rd, so be sure to check back there to see if you won!


Now on to my cards for today.  For the first card above, I used the gorgeous new  Adore Him Die.  I am soooo in love with this die!  I cut out 2 - one from silver mirrored paper and one from Night of Navy card stock.  I adhered them together just slightly offset for a shadow effect.  To create my "scroll",  I used the Leafy Edged borders and cut white card stock on two sides, trimmed the top and bottom to be at an appropriate angle for my card, and then I used the flag pole die from the Pennant Die set, cut off the knob on the end, and hand embossed a ridge instead, which matches the ridge that is embossed by the die on the rest of the pole.  I used tiny silver brads and a silver cord for simple embellishments.  

To construct the card from the bottom up, I used Neenah Solar Crest 140 lb white card for the base.  Next I used the BoHo Background Die to cut silver mirrored paper.  This gives a pretty embossed edge to the silver paper, and on it I matted a Night of Navy layer which I embossed with a Darice snowflake embossing folder.  I adhered my "scroll" using dimensional foam, and added the cording.  This was really simple and lays quite flat, but I love how it came out, and I hope you do too!


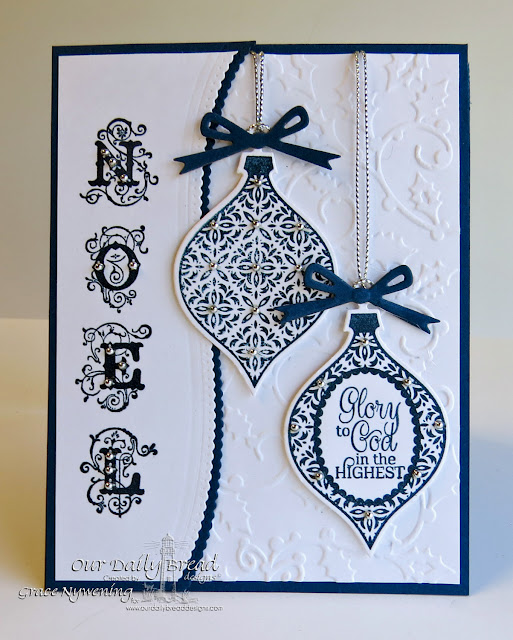
ODBD products: Elegant Embellishments stamps and dies, Flourished Alphabet set, leafy edged border dies, circle ornaments dies, designed by Grace Nywening

For my second card, I used  the new Elegant Embellishment stamp set, and the matching Elegant Embellishments Dies, as well as the beautiful Flourished Alphabet set.  I stamped the letters to spell "Noel" down the side of the card using Midnight Muse ink, and then I cut the edge with a Leafy Edged Border die, cutting the white and then another from Midnight Muse.  I stamped two of the ornaments in the Elegant Embellishment stamp set with the same ink, and die cut with the matching dies.  I cut two paper bows from the Circle Ornaments die set, and I "hung" my ornaments with some silver cord.  My base is Midnight Muse, and then a layer of white card stock which is embossed with a Cuttlebug flourished holly embossing folder.  I adhered the paper bows to the ornaments, and finished it off with tiny silver half pearls from Hobby Lobby.  This again makes a pretty flat card and I like the clean presentation.  

To re-cap, here are the NEW products I used today:

Additionally, I used the following:

PENNANT DIES - CSBD60 LEAFY EDGED BORDER DIESBOHO BACKGROUND DIES - CSBD107CIRCLE ORNAMENT DIES - CSBD45

In case you missed them, here are some other samples I've already shared using these new products:


Thanks so much for stopping by!  Now I'll send you on your way to visit the rest of the design team to be inspired by their incredible work!

Sandee * Julie * Cathy * Amy * Dawn * Lori
RobinT. * Lisa * Angie * Chris * Grace * Sabrina
Silke * America * Loretta * Robin C.