Friday, May 16, 2014

Taking a Look Back at the May Release!


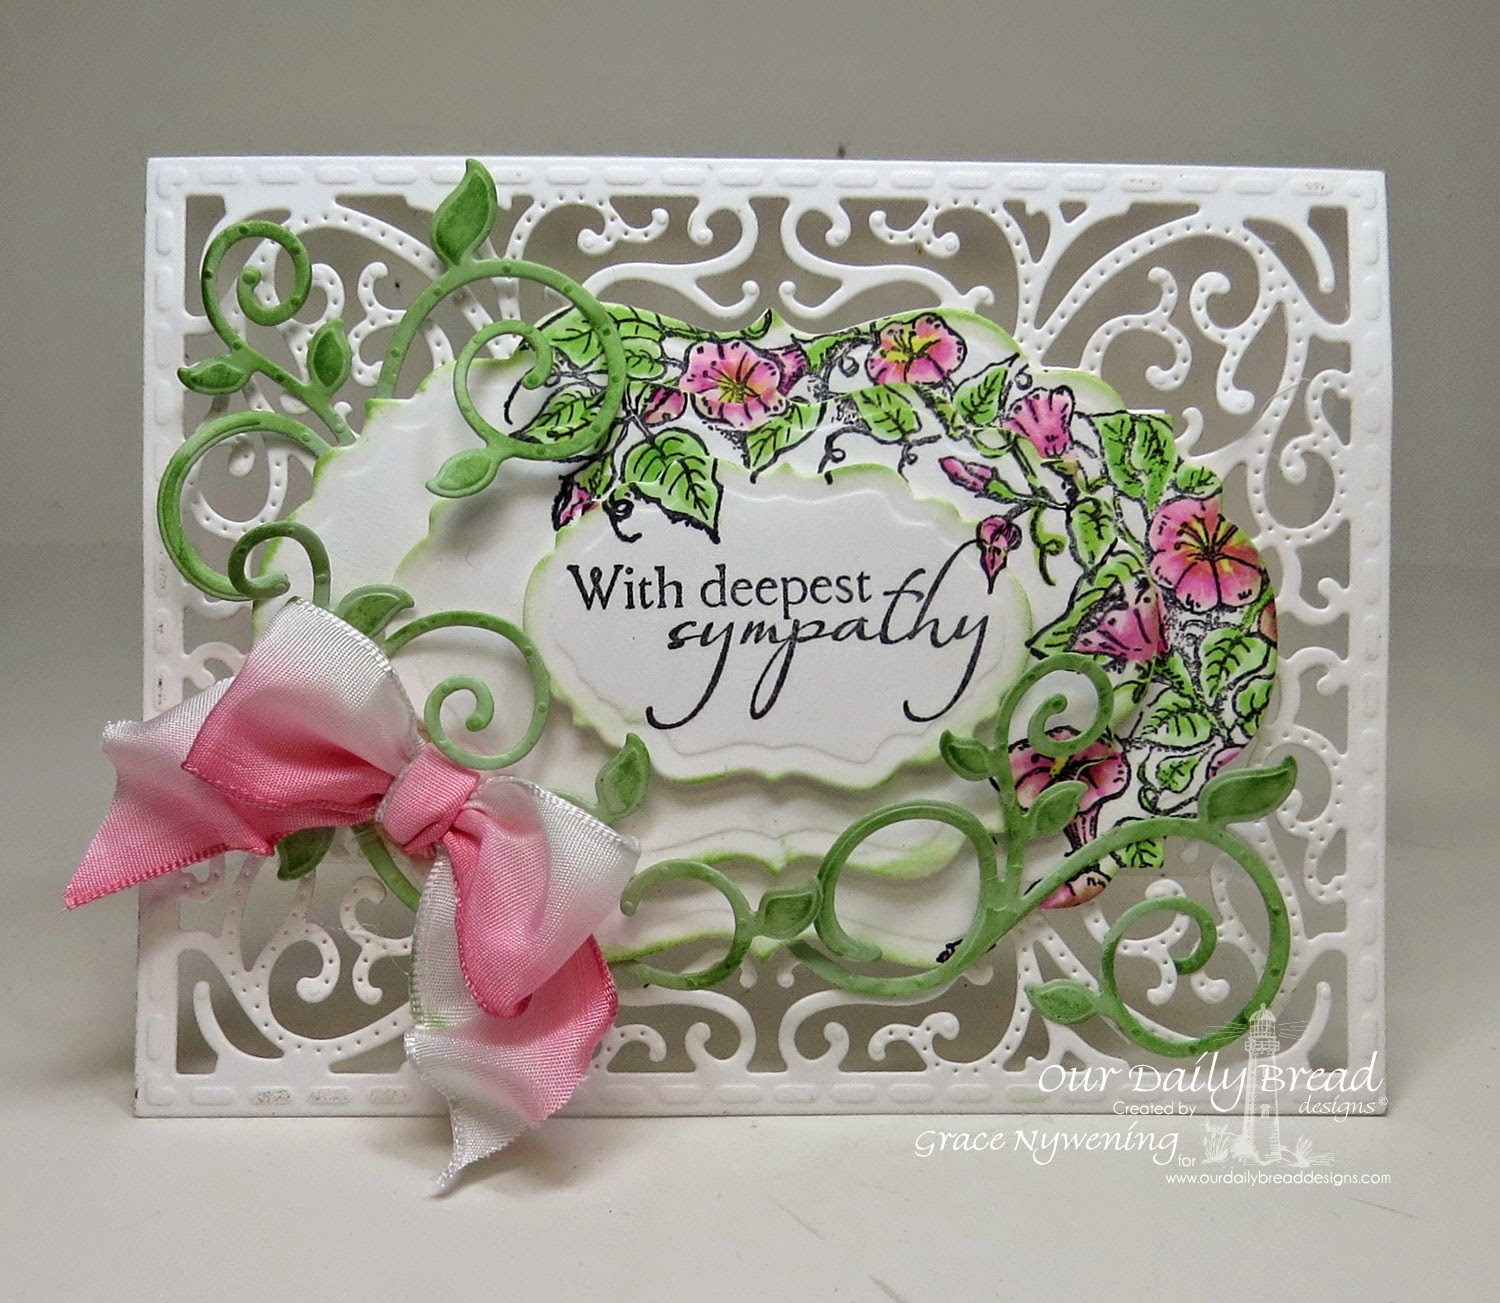
Our Daily Bread designs stamps, Glory, Carried to Heaven, ODBD Vintage Label Dies, Vintage Flourish Pattern Dies, Fancy Foliage Dies, designed by Grace Nywening

Hello sweet friends!  I hope you are all doing well and enjoying your week!

Today, the DT is taking a look back at the May Our Daily Bread designs release!  To see all the creations, you can visit the ODBD Blog.  To learn all the details about each designer's creation please visit each one as linked below.

Now for the details on my card:
I used the beautiful morning glory image from Glory, and the sentiment from Carried to Heaven.    I also used  the ODBD Custom Dies:  Vintage Label Dies, Vintage Flourish Pattern Dies, and Fancy Foliage Dies.

I decided I wanted my card front have a light and airy filagree feel, so I cut the Vintage Flourish Pattern Die, and then created a hinge that fits within the straight top part of the die by cutting the back of my card at an A2 size, PLUS about 1/4" along the long edge. I  scored at 1/4" and folded and burnished the card.  I trimmed off any excess that showed below the frame, and then adhered with tacky tape to the back of the Vintage Flourish Pattern Die.  Now I have a pretty see through design for my card front. I then triple stamped my image on three different sizes of the Vintage Label Dies, colored my image, and stamped the sentiment on the smallest die cut.  I lightly sponged the edges. Next,  I popped each layer up and then added some of the flourishes from the Fancy Foliage Die set.   My only other embellishment is a little white and pink bow.  I like how this came out.  I decided that I will put my message on another Vintage Label die on the inside, set right behind the front one so you don't see my writing  from the front of the card. 


I hope you enjoyed my project, and that you'll take a few minutes to visit my DT sisters and be inspired by their awesome work!

  * Julie * Stacy * Dawn * Sandee * Lori * Chris * Cathy * Sabrina * Wanda * Silke

Wednesday, May 14, 2014

Always Remembered, Forever Loved!

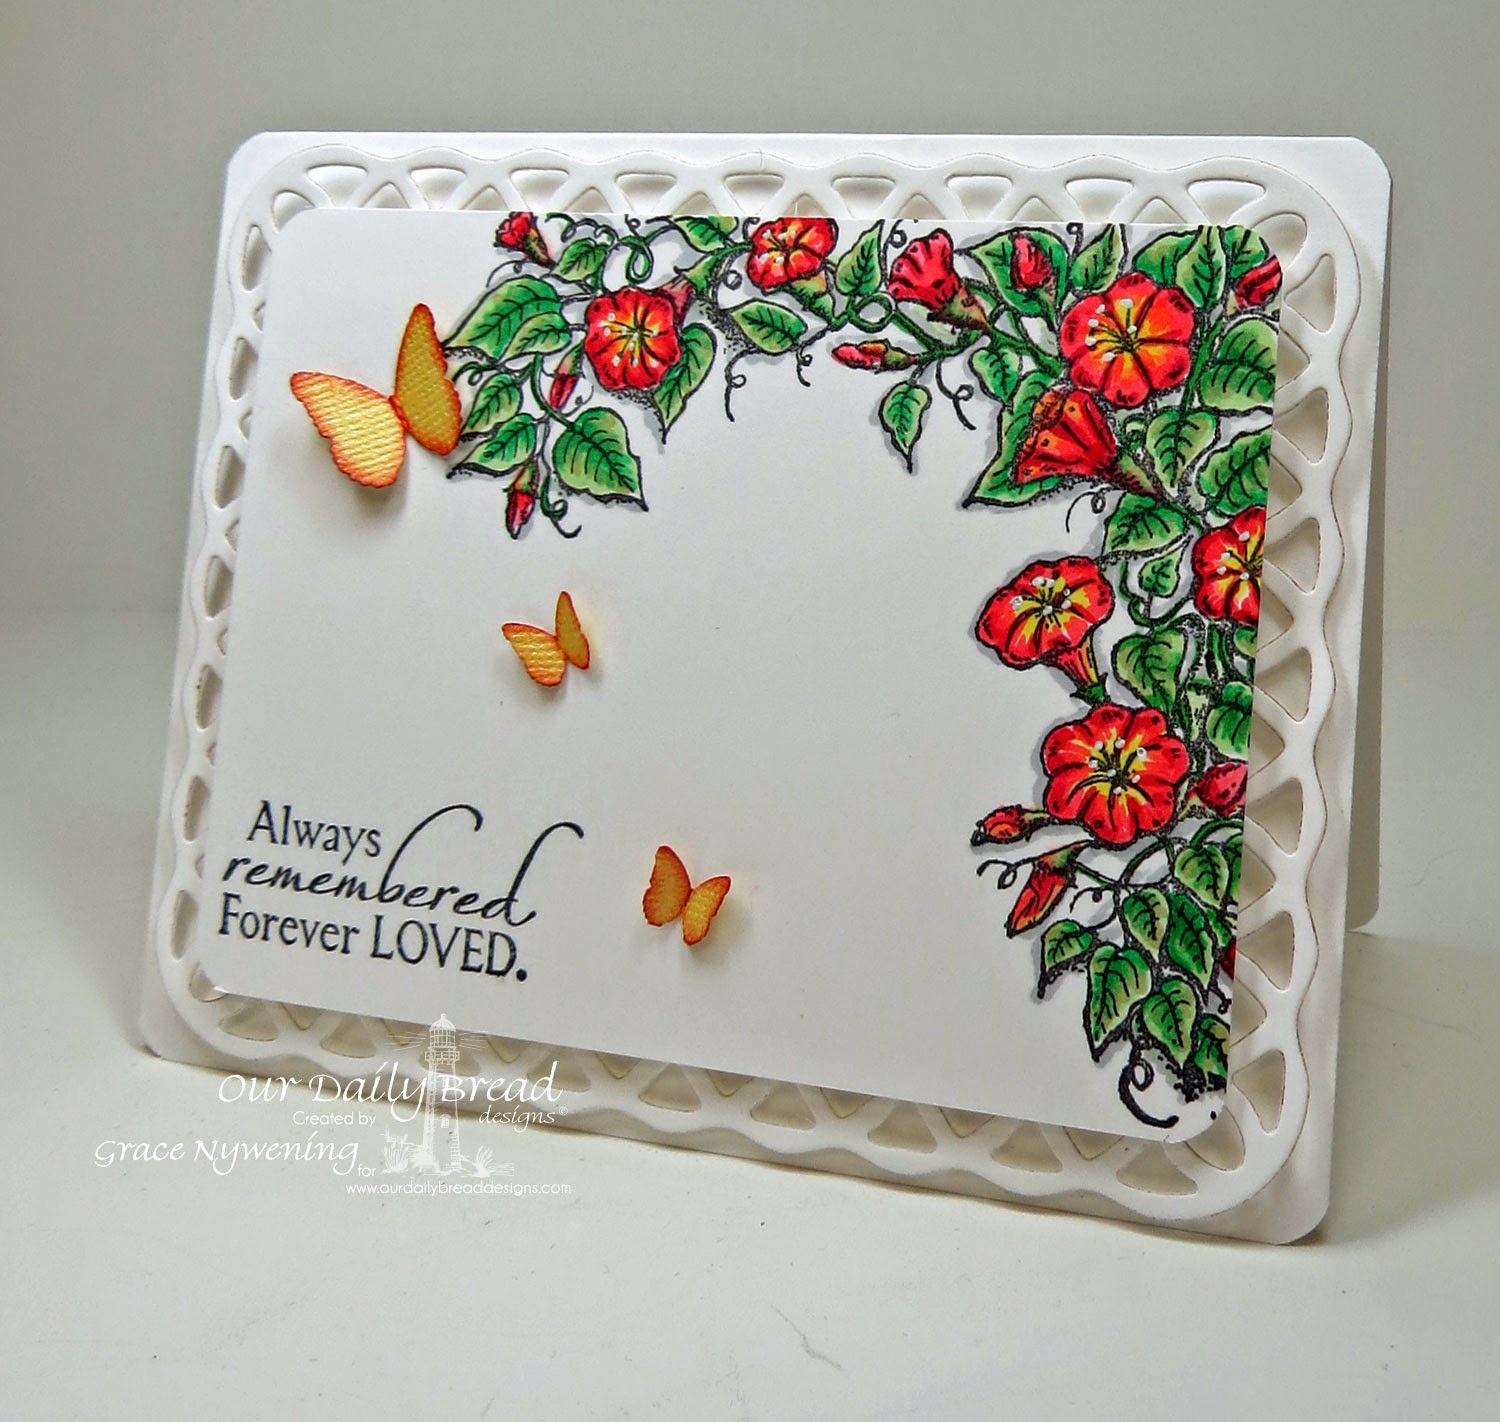
Our Daily Bread designs stamps, Glory, Carried to Heaven, designed by Grace Nywening
Hello friends!  I hope you're having a great day!

Today I'm sharing a card I made for the color challenge on SCS.  The colors were real red, old olive and daffodil delight.  I came as close as I could with my Copics, coloring this gorgeous morning glory image from the ODBD set, Glory. I added some white opaque gel pen dots to my flowers. I used Carried to Heaven for my sentiment, and punched out some yellow butterflies with a Martha Stewart punch.  The lattice frame is from Spellbinders.  I rounded my corners with a SU! punch.  Each layer is popped up on foam dimensionals, and there are no embellishments so it's pretty flat and mailable!!!  I am so happy to be finally getting comfortable in my own skin, so to speak, doing things more clean and simple!  While I will always love my layers.... I don't really like one layer cards much.... yet I have come a long way in not having to embellish everything to the hilt!  LOL~ One layer cards make me feel like anyone can go to the Dollar Store and get one of them for next to nothing, and I don't want to feel like I'm cheating the recipient of the added care a special hand made card requires.  That said... I am finding a sweet spot somewhere between overly CAS and over done and expensive to mail. 

That brings to mind a verse that I often think of when I'm creating.... Col. 3:23

"Whatever you do, work at it with all your heart, as working for the Lord, not for men."

Well, that's a quick post for today.... I hope you like it and perhaps are inspired in some small way to step outside of your comfort zone, and whatever you do, to do it for the Lord!

I am entering this in this week's Word Art Wednesday ~ always anything goes with their free digi or any encouraging sentiment or Scripture, and this week's Shining the Light Challenge ~ a word challenge: FLOWER - use 4 of the letters in the word flower as the first letters of things on your card:
F-Flowers
L- Lattice
O- Opaque Marker
W- White Space
E- Embossed Spellbinders Die
R- Red

Thanks so much for stopping by!


Monday, May 12, 2014

Press On!


Hello friends!  I hope you all had a wonderful weekend!  I got to spend time with my kids so that was fun.  I have however not been feeling great since so am laying a bit low.  I am popping in to share a water color I did for an challenge on SCS but have not had the chance to share with you here on my blog yet.

This card uses a Stampin Up set, Simply Sketched, as well as a Sweet 'N Sassy sentiment.  I love them both!  For the image, I stamped with Archival ink and used Sahara Sand, Baja Breeze and So Saffron to color the image (this was a color challenge).  I matted with Sahara Sand and So Saffron.  I added score lines to the white panel to create the "illusion" of layers.  It's clean and simple, but I kind of like how it came out.  Hope you do too!

Have a wonderful week!!!

Today's Blessing:
Proverbs 16:9
We can make our plans, but the Lord determines our steps.

Friday, May 9, 2014

An Angel Ornament Tutorial!

Our Daily Bread Designs Angel Wings Die set, ODBD Beautiful Border dies, designed by Grace Nywening

Hello my friends!  Today I have a fun little tutorial for you on how to make this sweet little angel ornament!  I hope you'll give it a try and have as much fun with it as  I did!  I'd love to see what you come up with!  You can email me a picture at my email me link in the left side bar if you don't have a link to a gallery or blog to share with me.

Here are the MATERIALS you will need.

Our Daily Bread Designs Custom Angel Wings Die Set
ODBD Custom Beautiful Borders Dies
Spellbinders Grand Scalloped Circle Die (or trace a plate about 61/4" wide and hand cut)
Cheery Lynn French Pastry Doily Die
Platinum or Silver card stock (I used Martha Stewart)
White Card Stock (I used Georgia Pacific)
White Copy Paper
White Paper Doily 6" wide
Crystal or silver bead - mine is about 7/8" high, and 2 silver bead caps (I used 2 sizes, but both could be the same)
Silver cord, silver wire
Crystal Bling (Recollections used here)
Hot Glue Gun
Adhesive Tape or runner
Tombow Mono Metal Glue (available at most major craft stores)
Clothespins or paper clips to clamp while drying
Frosted Lace Stickles


 DIRECTIONS:

1. Cut platinum or silver card stock with Spellbinders Grand Circle or Scalloped Circle Die. (If you don't have the Grand Circles, find a plate about 6.25" wide and trace around it and hand cut the circle.  This layer really does not show much, just a little silver shows through your doily, but it gives rigidity to the ornament.  The ones that are just made out of doilies seem to smoosh very easily.  Also note... the exact measurement is not critical.  If you have something a little smaller or a little larger, it won't make a big difference.

2. Find the center of your circle (I measured and drew lines on the back side to find the center).  Cut one fourth of the card stock away.  Add adhesive to one edge as shown.


3.  Adhere the adhesive end over the other end, forming a cone and matching scallops if you used the scalloped die.  I used adhesive strip, but I also added a thin line of TombowMono Metal glue right to the edge so there was o curing up.  I used clothespins to hold until it was dry.


4.Do the same with the 6" Doily.  You want to make the cone over top of the base cone so you know it fits nicely on top.(Again, size is not critical as long as it will fit over the base you created).  You can cut off any extra overlap if desired, or simply match patterns and overlap any extra.  I cut off my extra, leaving just enough for good adhesion in an overlap.


5. Place a dot of adhesive on the back of doily inside cone, to hold it to the base cone, but not much is needed as we will hold it together with the bead at the top later.

6.  Cut 1 Cheery Lynn French Doily from copy paper, and cut in half.


7.  Make 2 small cones for sleeves and adhere to the sides of your angel.  I used Tombow Mono Metal glue because it dries fast and holds very well.  Use clothespins or other clamps to hold in place until glue is set.  Sorry I missed getting a photo at this step but you can see in the below photos where the sleeves go.

8.  Pass a 4" piece of thin silver wire through large crystal bead, twisting it under the bead and down to the end. Add a silver bead cap (I used my smaller size here, with the curve facing up as shown below.   Cut 8.5-9" piece of silver cord and pass through one of the bead caps in the orientation shown below. (I used the larger one here).


9. Pass the silver cord with the silver bead cap down through the hole in the top of the cone. If the hole at the top of your cone needs to be a bit bigger, snip off just a tad so you can pass the cord through.  You don't need much room so start small and if you need more you can always take more, but try to keep the hole as small as possible while still allowing you to bring the cord trough.


 10.   Pass Crystal bead with wire and small cap down through the center of the other larger bead cap, spreading the silver cord so it comes out to the sides (one on each side) of the crystal bead.


11. Tie a knot in the silver cord near the end on the inside of the cone.


12.  While holding the cord in the position you want it to come out (on each side of the crystal bead head), add a good blob of hot glue right up in the top inside of the cone.  While it's still soft, position cords and bead as desired.  The hot glue when dry does a good job of holding this position if you have enough to completely surround the wire and cord.


13.  Cut 2 Angel Wings and one Beautiful Border with the ODBD dies, from white card stock.  Cut off just 2 sections of the beautiful border, and save the rest for a card or different project.


14.  Adhere one piece of the border at neckline in front, and one at back.  Adhere wings to back of angel and sleeves as shown below, using the Tombow Metal glue.  Now you can decorate as desired.  I used Recollections crystal bling and put one flourish on the back, and one on the front.  I added Stickles to the wings for some sparkle.


That's it!  You have a pretty ornament that's a lot sturdier than most paper doily angels, and is truly beautiful!  I hope you have fun with it!!!  These would be cute as Christmas tree ornaments, but could also be fun without the hanger cord, as favors on your table, perhaps with a little bag of goodies tucked up inside.  I could also see them as great little gifts for someone going through a difficult time who needs a reminder that God has given His angels charge over us, to keep us in all our ways.  There are lots of possiblities and you can pop these out very quickly once you get your "groove" going! :)

This brings to mind a Psalm that reassures us of God's protection and watch care over us, if we know Him and place our total trust in Him.  It blesses my heart every time I read it.

Ps. 91

1 He that dwelleth in the secret place of the most High shall abide under the shadow of the Almighty.
I will say of the Lord, He is my refuge and my fortress: my God; in him will I trust.
Surely he shall deliver thee from the snare of the fowler, and from the noisome pestilence.
He shall cover thee with his feathers, and under his wings shalt thou trust: his truth shall be thy shield and buckler.
Thou shalt not be afraid for the terror by night; nor for the arrow that flieth by day;
Nor for the pestilence that walketh in darkness; nor for the destruction that wasteth at noonday.
A thousand shall fall at thy side, and ten thousand at thy right hand; but it shall not come nigh thee.
Only with thine eyes shalt thou behold and see the reward of the wicked.
9 Because thou hast made the Lord, which is my refuge, even the most High, thy habitation;
10 There shall no evil befall thee, neither shall any plague come nigh thy dwelling.
11 For he shall give his angels charge over thee, to keep thee in all thy ways.
12 They shall bear thee up in their hands, lest thou dash thy foot against a stone.
13 Thou shalt tread upon the lion and adder: the young lion and the dragon shalt thou trample under feet.
14 Because he hath set his love upon me, therefore will I deliver him: I will set him on high, because he hath known my name.
15 He shall call upon me, and I will answer him: I will be with him in trouble; I will deliver him, and honour him.
16 With long life will I satisfy him, and shew him my salvation.

I have entered this in this week's Shining the Light Challenge, which is "Wing it".  You still have a couple days to play along and possibly win a prize!


Thanks so much for stopping by!  I hope you enjoyed this little project and were blessed as well!

Hugs,

Wednesday, May 7, 2014

Key To My Heart!

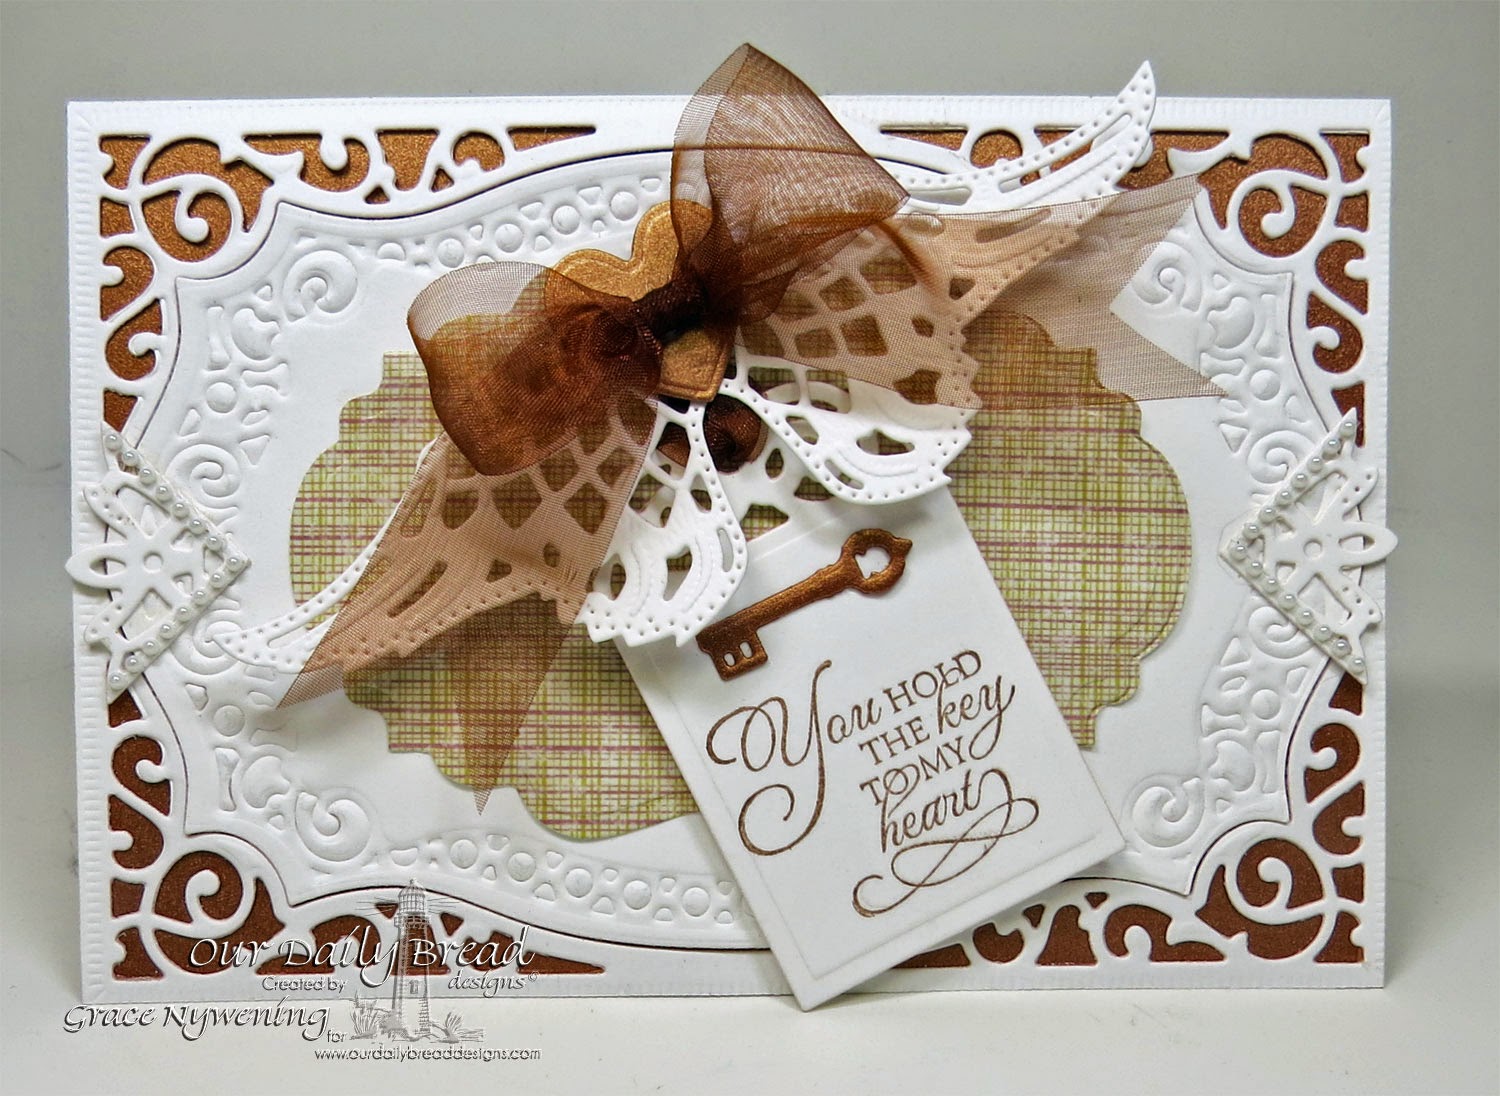
Our Daily Bread designs stamps, designed by Grace Nywening

Hello sweet friends!  I hope your week is going well!  I have been super busy this week but much of it has been working on getting my new blog email ready to roll out.  There's still some things I have to work out but hopefully soon, I will have a brand new email program that will be a huge upgrade to what Feedburner was!

Anyway... I do have a card to share with you today.  This card didn't come out the way I saw it in my head but I used a metallic copper base, then die cut a white layer with Spellbinders  Majestic Labels 25 , then I cut a piece of the ODBD new paper release, Rustic BeautyPaper Collection with the ODBD Vintage Label Dies. On that I layered a tag I stamped with the new release, Key to Heaven with Memento Rich Cocoa and cut with the ODBD Custom Recipe Card and Tags die.  I tied that on with a coppery sheer  ribbon and topped with a pair of angel wings cut with the gorgeous new Angel Wings dies in white.  From the same Angel Wings die set I cut the tiny copper key that I added to the tag.    I topped the Angel wings with a small heart cut from the metallic copper with the ODBD Ornate Heart Dies.  I added a sheer ribbon bow and then I added two of the smallest corner dies from the ODBD Decorative Corner Die set, and topped them with some tiny white pearls to add a little texture and elegance.

So what do you think?  Is this too fufu for a guy?  (Jim... I know you can tell me!)  My plan when I started this with the copper and the designer paper was to make it more masculine for my hubby later on this summer when we celebrate our 43rd anniversary.... but now I'm wondering if it's a little too fussy?  I'd love to know what you think! 

I am entering this in this week's Shining the Light Challenge - Wing it!  Come play along!!!

Today's Blessing:
"The steps of the godly are directed by the Lord.  He delights in every detail of their lives."
Ps. 37:23 (NLT)

Thanks so much for stopping by!!!

Hugs,


Tuesday, May 6, 2014

A Whispered Prayer and a little change!

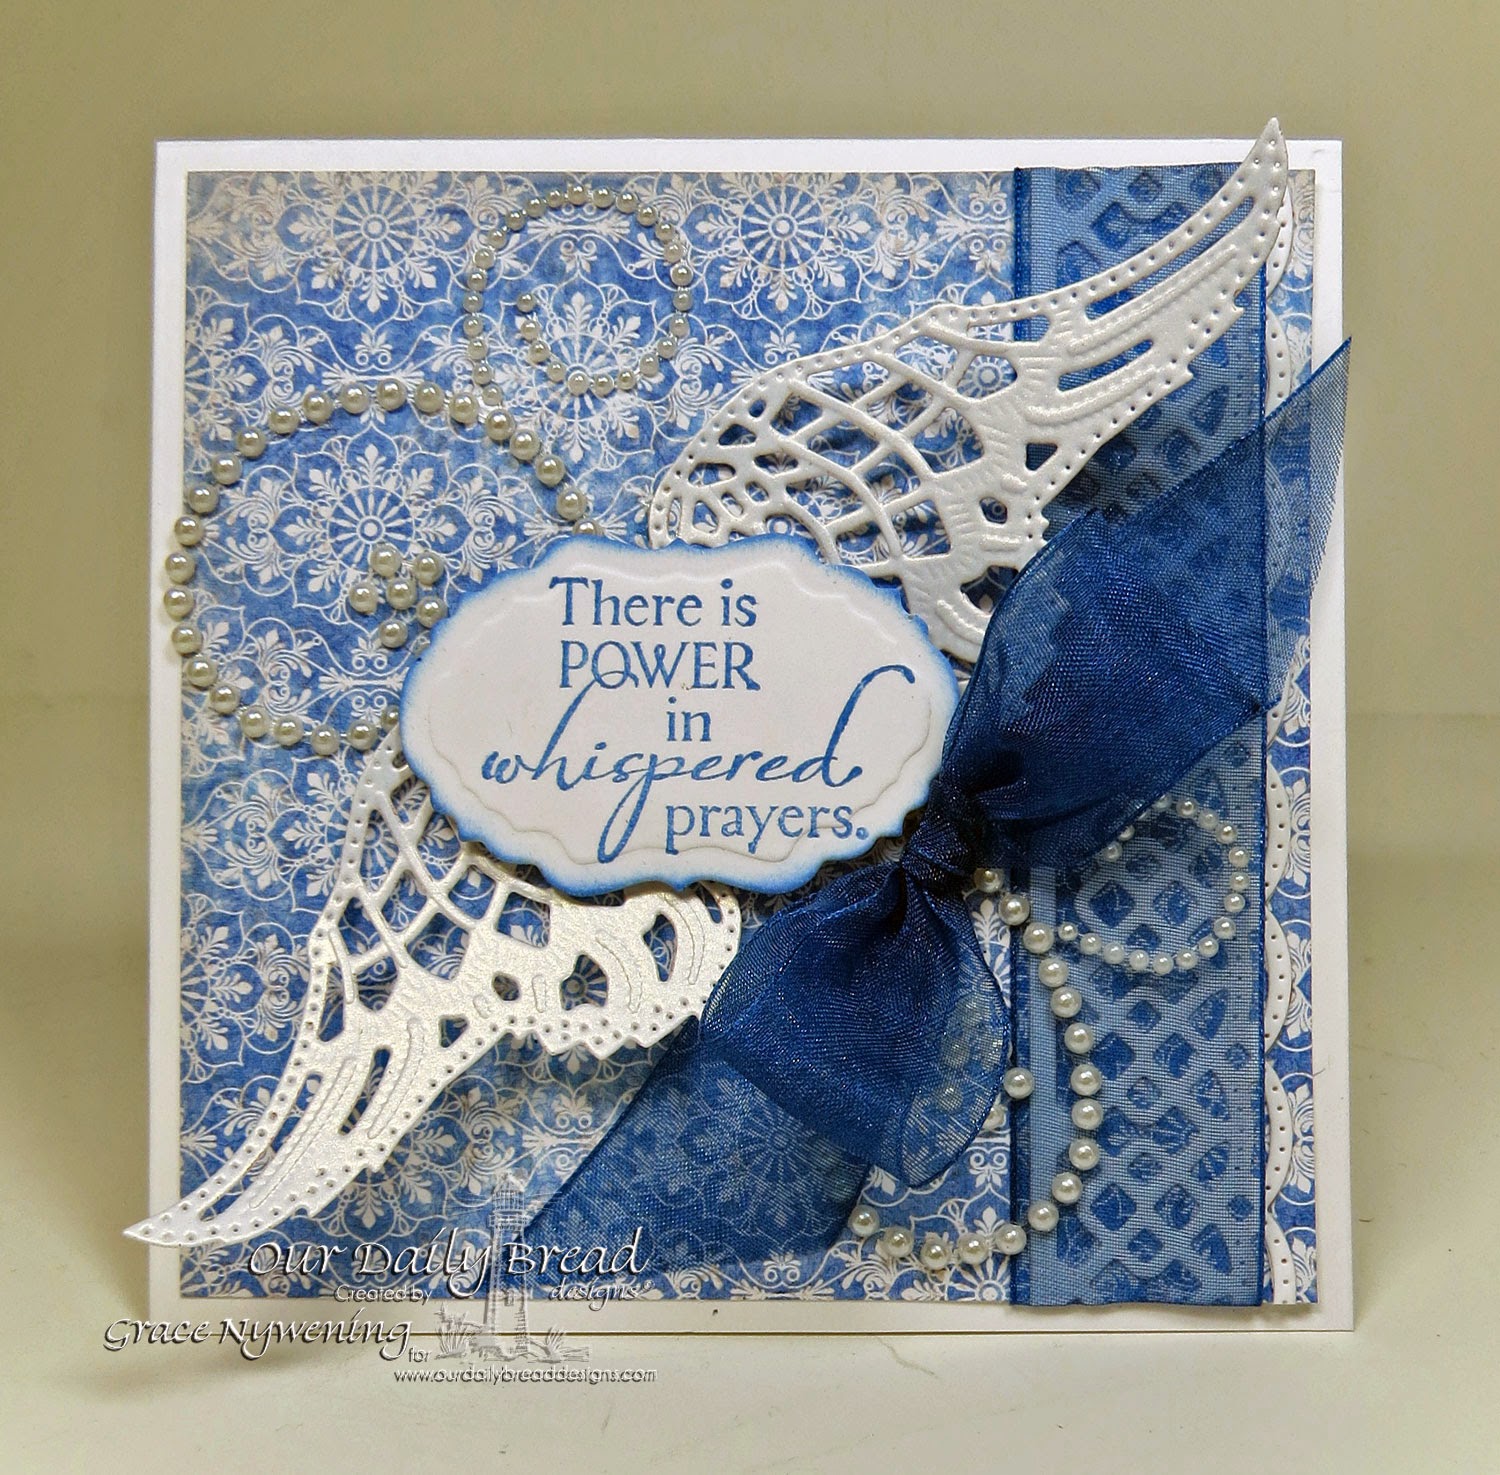
Our Daily Bread designs stamps, dies, designed by Grace Nywening
Hello sweet friends!  I hope you are having a great day!!!

First I want to let you all know that I have changed my blog address.  It is now on my own domain instead of blogger, so my new blog address is:
www.th-ink-ingofyou.com

If you have been an email or RSS subscriber and have stopped getting my emails.... this is the reason I changed to my own domain. Feedburner has been not functioning well for several months, and little by little, I have been losing many readers... we're talking over 900 lost!  So I decided to move my blog to my own domain so I do own my email list, and I will soon be hosting the email list with a different email server than Feedburner.  I hope I will be able to maintain my current list when I make the switch, but just in case... if you subscribe by email either by Blog Lovin or Feedburner... please consider resubscribing if you have not been getting my emails.

I also have a new email address, which is linked in my email me button on my side bar.

One more favor I have to ask is that IF you do have my blog address in your side bar as a link, that you would please change it to the above address.  Google is supposed to redirect all traffic, but I have heard that often it doesn't work, so just in case, correcting the link would fix any possible problems.

Thank you so much to my faithful subscribers!!!  You mean the world to me and are the reason I take the time to post when I do! 

Today I have a card to share that's a little smaller than usual.  It's 4.25 square.  It was quick and easy to create and lays pretty flat for mailing.  I used a white base, then a layer of design paper from the ODBD Christian Faith Paper Collection.  I stamped my sentiment from Holy Angels with Brocade Blue ink, and cut it with this month's release, Vintage Labels Die set.  I then die cut the wings with the ODBD Angel Wing's die set from a shimmery white paper from a Martha Stewart pack.  I also cut a white border from the Beautiful Borders die set, and adhered that down the right side of the card. I covered that with sheer blue ribbon, adhered to the back of the blue paper, then adhered it all to the white base.  I added some ZVA pearl swirls under the sentiment panel, adhered the wings, and then the sentiment on dimensionals.  Finally I finished off with the sheer bow.  Super quick and easy, but elegant and I love the sentiment!   This could be used to encouarage anyone going through a tough time.... and we all know plenty of people who are doing just that these days!  So why not pray while you're creating your next card... and let the recipient know you are praying for them!  There's really no greater gift!

I am entering this in this week's Shining the Light Challenge over on the ODBD Blog.... which is "Wing it".  Why don't you play along!

Hugs & Blessings,

Thursday, May 1, 2014

Welcome to the ODBD May Release!

Our Daily Bread designs stamps: Key to Heaven, Glory, ODBD dies Angel Wings, designed by Grace Nywening


 Welcome to the Our Daily Bread designs May release!

If you haven't had a chance to view the full release yet, I know you'll want to pop on over to the  ODBD Blog and see it!   You're in for some real eye candy as you hop along today... the DT have outdone themselves with this month's stamps and dies!
 
Prize Information:
Three winners will be randomly chosen from the comments left on the designers blogs to receive a $15 Gift Certificate to the ODBD Store, to be used toward the purchase of ODBD Stamps.  You have until May 2, 2014 at 9:00 p.m. EDT to leave your comments!  The Winners will be posted on the ODBD Blog on May 3rd, so be sure to check back there to see if you won!
Now... on to my cards...
For the card above, I created a center step card (My Tutorial HERE).   I had so much fun creating my welcoming door!  The new ODBD products I used for this card are: Key to Heaven, Glory, Angel Wings dies, as well as past releases: ODBD Fancy Foliage dies, Ornamental Crosses dies, Recipe Card and Tag dies.  Additionally I used SB dies: Classic Squares Lg, Petite Ovals Lg, Petite Circles Sm, Classic Circles Lg.

My designer paper is from My Mind's Eye Fiddlesticks, because I had not received the new ODBD Rustic Beauty Paper Collection yet, but this would be absolutely PERFECT for the wood designs in this new pack!!!   I used a base of Neenah Solar White and a mat of Bazzil, and some copper metalic card stock.  Inks were Memento Black, Distress Pumice Stone.  Accessories used were an Martha Stewart Bough punch, Brads, and a scoring tool.
After constructing the center step card, I added the side panels of wood grained designer paper and created the door by cutting a mat of Bazzil, then cutting 4 small squares and one larger square to make my "faux" panels.  I sponged them and adhered.  I added the brad door knob and key hole.  To decorate the door I cut two circles, one of white and one of green to mat it.  I stamped my sentiment from Key to Heaven in the center and then cut 5 of the small foliage from the Fancy Foliage die set, and 5 of the tiny flower from the Ornamental Cross dies.  I spritzed the flowers with water and molded them to a 3-D shape, sponged with Primrose Petals, and when dried, I adhered my greenery and leaves to create a wreath on the door.  For the sides, I cut a small tag from the Recipe Card and Tags die set from bazzil, then cut a white insert for it and stamped it with Distress ink using the new Glory set, picking up just a little design for my key hoder.  I cut the key from copper metallic card and "hung" it on a brad.  Both flower pots were made by cutting pink card with SB Petite Ovals, and then cutting the tops and bottoms off at different heights.  I did use my stylus to create an embossing line for the top and bottom to match the rest of the die cut pieces.  I then punched several boughs with the MS punch and adhered to the back of the pots.  I added one tiny cross die cut from the Ornamental Cross die set for my door knocker, and added some tiny pearls to the flowers and called it done.


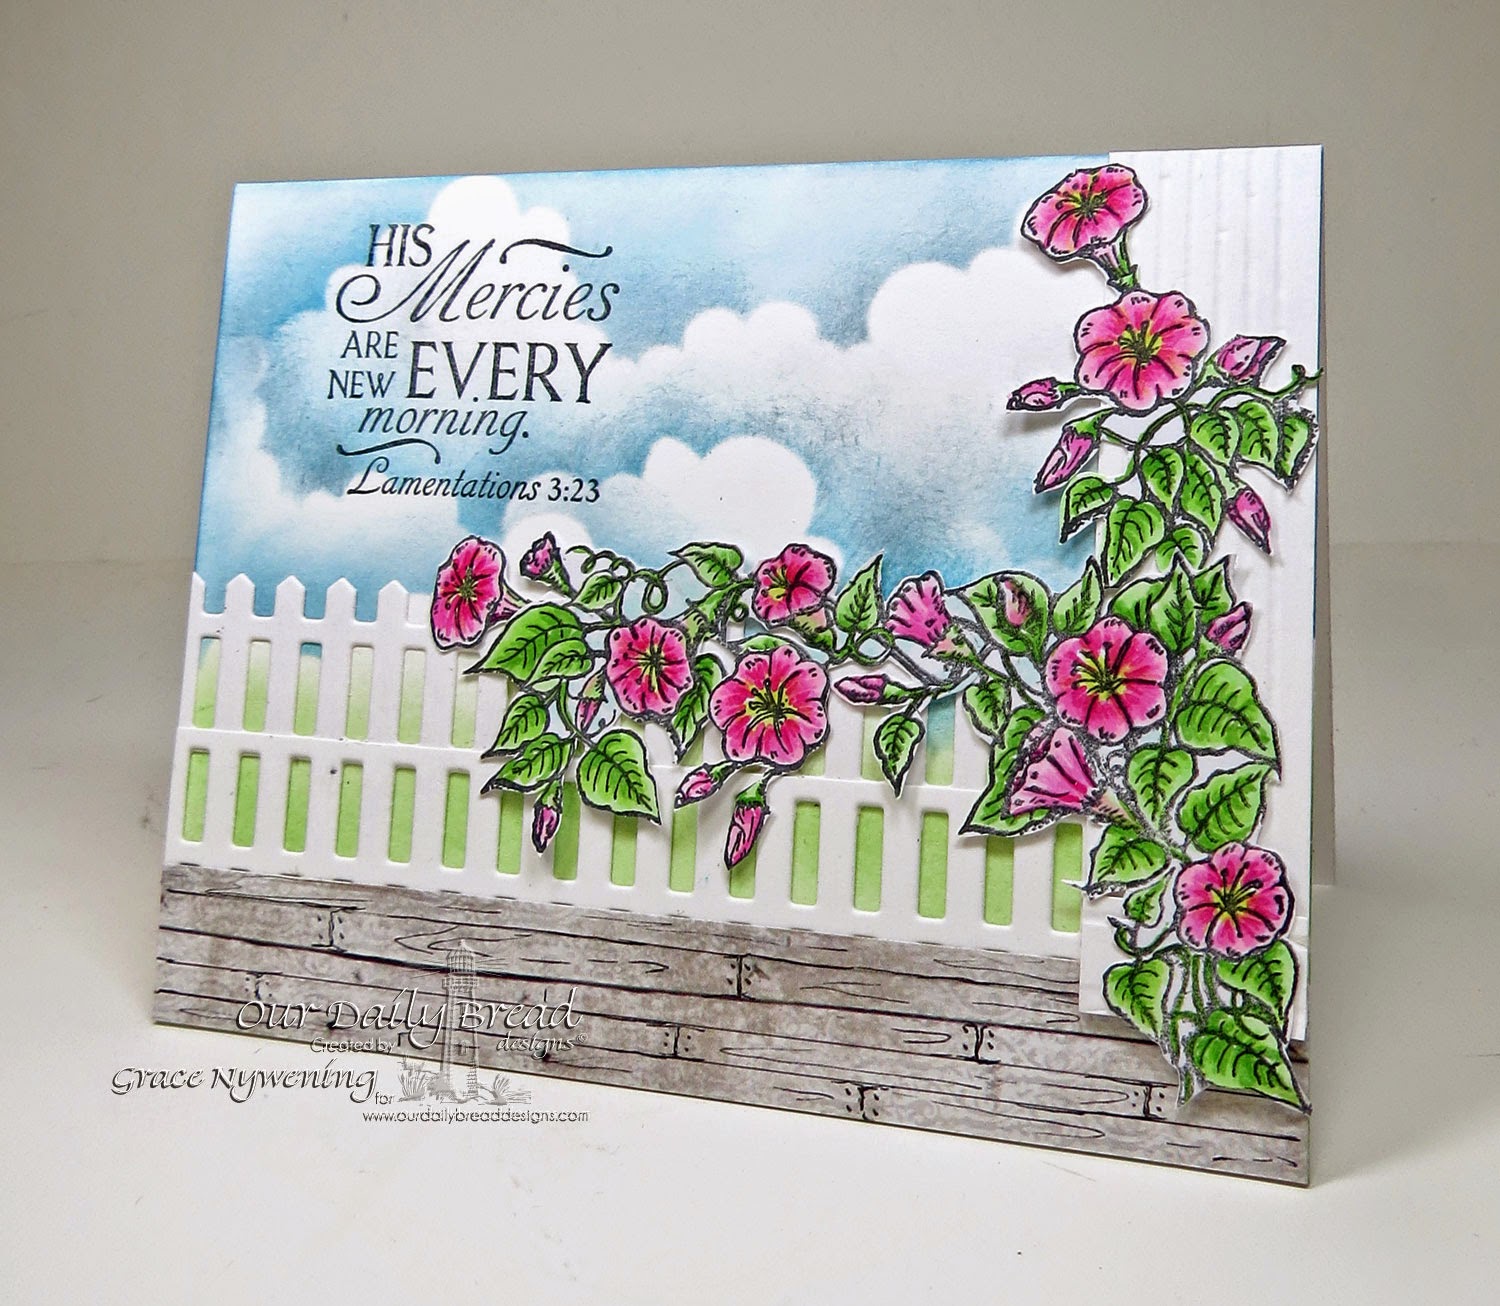
For this second card, I used the new release, Glory.  I LOVE this set... the sentiments and verses are just perfect and the image is so fun to color!!!  I used the ODBD Fence Die which I cut twice and overlapped to make it a bit taller.  I sponged my background, colored and cut out the morning glories, and created my porch scene by making a scored "pillar" on the right side for the morning glories to climb up on.  I added the wood grain design paper at the bottom, doodling in boards and nails to hopefully give the illusion of a porch floor.  I stamped the verse directly on the card front.  Totally flat, and totally mailable!  If you send many cards, you have to love that!

Here are the new releases I used today:


;;

Here are the past releases I used:

 CSBD54 - ORNAMENTAL CROSSES DIES

 CSBD33 - FANCY FOLIAGE DIES

 CSBD31 - RECIPE & TAGS DIES

 FENCE DIE


Please be sure to hop to each of my DT sister's blogs to see all their incredible creations, and be sure to leave a comment on each one so you don't miss a chance to win!!!

Chris *  Cathy * Julie * Stacy Dawn * Sandee * Lori * Sabrina * Lisa * Angie * Wanda * Silke * Audrey Silke